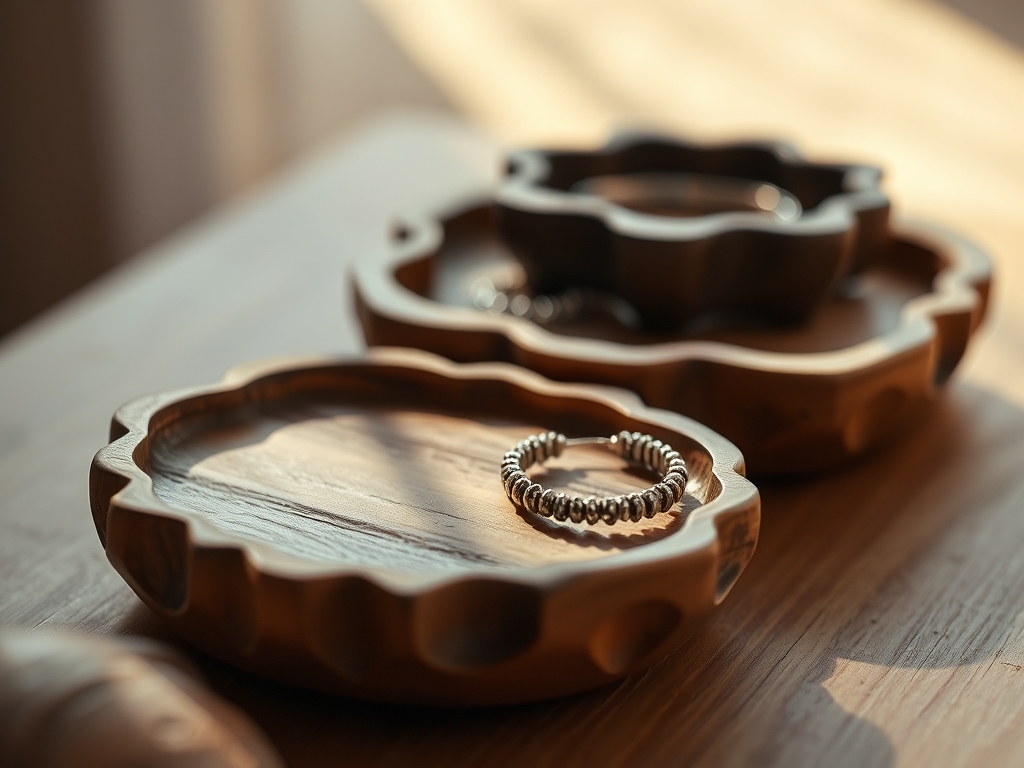
Imagine the smell of freshly cut walnut hitting your senses like a shot of espresso. It is earthy, rich, and slightly sweet. As you run your thumb across the rough-sawn plank, you can feel the density of the heartwood. It is heavy because of its tight cellular structure. We are going to transform this raw lumber into stunning Hand Carved Jewelry Trays that look like they were pulled straight from a riverbed. You are not just making a dish; you are manipulating the lignin and cellulose fibers of the wood to create a vessel that feels soft to the touch but remains structurally indestructible. Walnut is the king of hardwoods for this task because its tensile strength allows for thin, elegant edges without the risk of shattering under the pressure of a sharp gouge. It has a high resistance to warping, which is vital when you are thinning out the center of a block. Grab your apron and tie your hair back. We are about to dive into the physics of woodcraft.
THE STUDIO KIT
To master Hand Carved Jewelry Trays, you need a kit that respects the grain direction of the walnut. You will need a set of bent gouges, specifically a #7 or #8 sweep, which allows you to scoop out the hollows without the handle hitting the rim. A marking awl is essential for scribing your organic outlines into the wood surface; pencil lines can smudge, but a scribe physically severs the top layer of fibers for a cleaner start. You will also need a mallet with a urethane head to dampen vibration and protect your tool handles. For the finishing stages, grab a cabinet scraper to remove tool marks and a range of sandpaper from 80 to 400 grit.
If you cannot source black walnut, Material Substitutions include cherry or mahogany. Cherry is slightly softer and easier on the hands, while mahogany offers a similar porosity but with a more interlocking grain that requires a very sharp edge to prevent "tear-out." Avoid pine or cedar for this project; their low specific gravity makes them too brittle for the delicate, thin walls required for high-end jewelry storage. You want a wood that can be burnished to a high sheen using nothing but friction and a bit of oil.
THE TEMPO
The "Maker's Rhythm" is a three-act play. Act one is the Milling and Layout, taking about forty-five minutes. This is where you study the wood for knots and stress fractures. Act two is the Bulk Removal, which is the most athletic part of the process. Depending on the depth of your tray, expect to spend two to three hours per piece using your gouges and mallet. Act three is the Refinement and Finishing, which takes another two hours. This phase cannot be rushed. You are waiting for the wood to "settle" after you have removed the internal tension of the fibers. If you carve too fast, the wood can actually move or "cup" as the internal moisture levels rebalance with the studio air. Allow for twenty-four hours between your final sanding and your first coat of oil to ensure the surface is perfectly dry and the pores are open.
THE CORE METHOD
1. Scribing the Organic Silhouette
Use your calipers to measure the thickness of your walnut slab. You want at least one inch of depth to work with. Draw your organic shape; think of a smooth river stone or a falling leaf. Once you are happy, trace the line with your marking awl. This creates a physical "trench" that stops your chisel from skidding.
Mastery Tip: This technique utilizes fiber severance. By cutting the surface fibers before you begin heavy carving, you prevent the grain from splitting past your intended border. It ensures the structural integrity of the rim remains crisp.
2. Establishing the Depth Perimeter
Take your straight chisel and verticalize the edges of your interior shape. You are essentially "stabbing" into the wood about an eighth of an inch deep. This creates a relief wall. Work your way around the entire inner circumference before you ever touch a gouge.
Mastery Tip: This creates a stop cut. When the gouge moves toward the edge, it hits this vertical wall and stops. This prevents the tool from jumping out and ruining the outer rim, which is the most fragile part of the tray.
3. The Radial Hollowing Process
Starting from the center, use your #7 sweep gouge to remove material in a radial pattern. Work from the center out toward the edges, but always stop just before your stop cut. You should be removing "chips" that look like small scoops of chocolate.
Mastery Tip: Always carve with the grain direction. If the wood starts to splinter or feel "hairy," you are carving against the grain. Flip the tray 180 degrees. This reduces friction and prevents deep gouges that are impossible to sand out later.
4. Refining the Concave Surface
Once the bulk is gone, switch to a cabinet scraper. This tool does not cut; it shears the wood at a microscopic level. Drag it across the interior to smooth out the ridges left by the gouge. This is much faster and cleaner than starting with heavy sandpaper.
Mastery Tip: Scrapers work via mechanical shear. They create a surface that is more hydrophobic than sanded wood because they cut the fibers cleanly rather than crushing them. This makes your final finish look much deeper and clearer.
5. Burnishing and Oil Saturation
Sand the piece through the grits, then apply a food-safe mineral oil or beeswax. Use a bone folder or a smooth piece of hardwood to rub the surface vigorously. This "burnishing" technique presses the fibers down and creates a natural luster.
Mastery Tip: This process relies on capillary action. The heat generated by friction helps the oil penetrate deeper into the porous structure of the walnut. It seals the wood from the inside out, protecting your jewelry from any residual moisture.
THE TECHNICAL LEDGER
Maintenance & Longevity: To keep your Hand Carved Jewelry Trays in gallery condition, avoid direct sunlight which can bleach the rich dark pigments of the walnut. Re-oil the piece once a year using a lint-free cloth. If the wood feels "dry" or "thirsty," it is time for a refresh.
Material Variations: For a premium upgrade, look for figured walnut or "claro" walnut. These pieces have wavy grain patterns that create a 3D effect called chatoyancy. For a sustainable route, use "off-cuts" from local furniture makers; these small scraps are often the perfect size for jewelry trays and reduce industrial waste.
The Correction:
- The Mistake: Carving too deep and creating a "soft spot" in the bottom. The Fix: Glue a thin piece of leather or felt into the bottom of the tray to add structural support and hide the thinness.
- The Mistake: A large chip breaks off the rim. The Fix: Save the chip! Use cyanoacrylate (super glue) to reattach it immediately. The tight grain of walnut hides glue lines exceptionally well.
- The Mistake: Sanding scratches are visible after oiling. The Fix: Wet the wood slightly to "raise the grain," let it dry, and sand again with your highest grit. This pops the fibers back up so they can be cut off.
Studio Organization: Store your walnut blanks in a cool, dry place away from concrete floors. Concrete can leach moisture into the wood, causing it to rot or discolor. Keep your gouges in a tool roll to prevent the edges from clinking together; a dull tool is a dangerous tool.
THE FINAL REVEAL
Look at that! Your Hand Carved Jewelry Trays are finished, and they look absolutely sophisticated. The way the light catches the curves of the walnut is pure magic. You have taken a rigid, heavy block of timber and turned it into something that looks fluid and organic. The contrast between the dark, chocolatey wood and your sparkling gold rings or silver necklaces is the ultimate aesthetic goal. You did not just make a tray; you mastered the physics of wood. It feels heavy in the hand, smooth to the touch, and it carries the soul of the maker in every curve.
STUDIO QUESTIONS
What is the best way to sharpen gouges for walnut?
Use a slip stone with a fine grit to hone the inside of the sweep. Walnut is dense, so you need a razor edge to prevent the fibers from crushing. A stropping block with polishing compound is essential for a mirror finish.
How do I prevent the tray from cracking over time?
Ensure the wood is kiln-dried or properly seasoned before carving. Avoid extreme temperature shifts in your studio. Applying a high-quality wax finish creates a vapor barrier that slows down moisture exchange, preventing the wood from "checking" or splitting.
Can I use a rotary tool for the hollowing process?
Yes, an oscillating tool or a rotary carver with a carbide burr works quickly. However, it creates significant dust and lacks the clean "sliced" finish of a hand gouge. Always wear a respirator if you choose the power-tool route.
How thin can I safely carve the walls of the tray?
For walnut, you can safely go down to one-eighth of an inch. Any thinner and you risk the wood becoming brittle or translucent. Keeping a slightly thicker base provides the necessary weight to keep the tray stable on a nightstand.