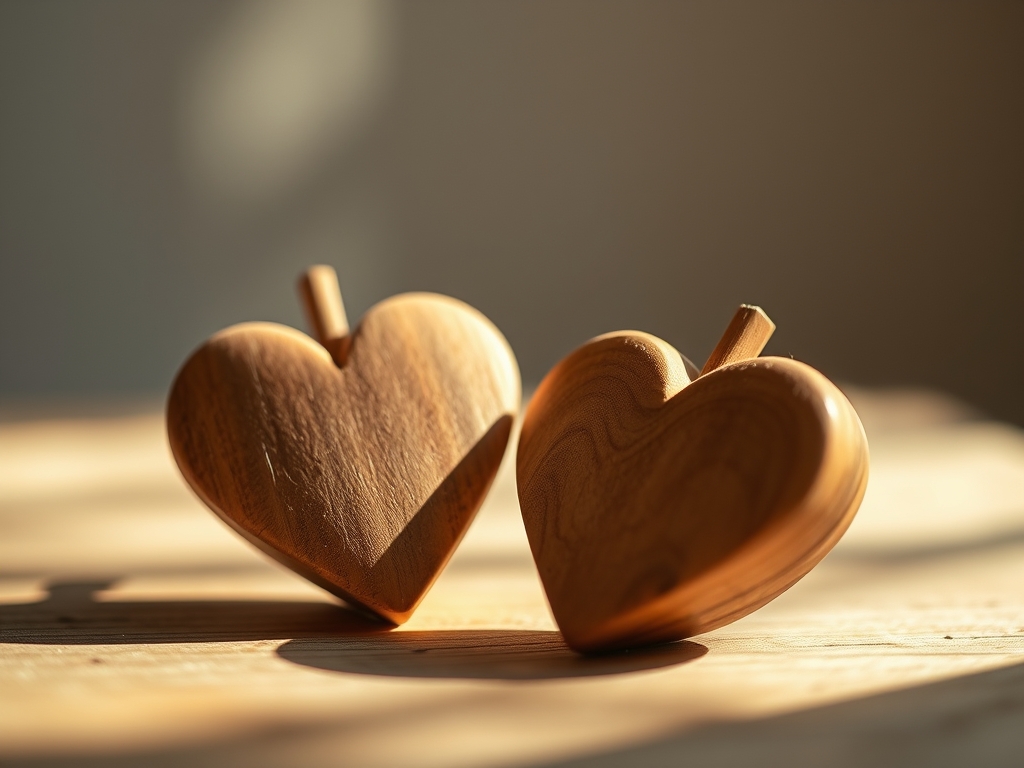
Close your eyes and imagine the weight of a perfectly smooth pebble, but instead of cold stone, it radiates the organic warmth of cellular cellulose. There is something deeply primal about holding Hand Carved Wooden Hearts; they are tactile anchors that fit right in the palm of your hand. When you are carving these pocket gifts, you are not just shaving away chips; you are navigating the complex highway of xylem and phloem. The grain direction dictates every move of your blade. If you go against the natural growth rings, the wood fibers will tear rather than shear, leaving a jagged surface that ruins the sensory experience. We are aiming for a finish so liquid-smooth that it feels like the wood has turned into silk. Achieving that requires more than just a sharp knife; it requires an understanding of how moisture, friction, and oil interact with the porous structure of the timber. Whether you are using a dense hardwood like cherry or a buttery soft basswood, the goal is to create a surface that begs to be touched. Let us dive into the physics of the perfect pocket heart.
THE STUDIO KIT
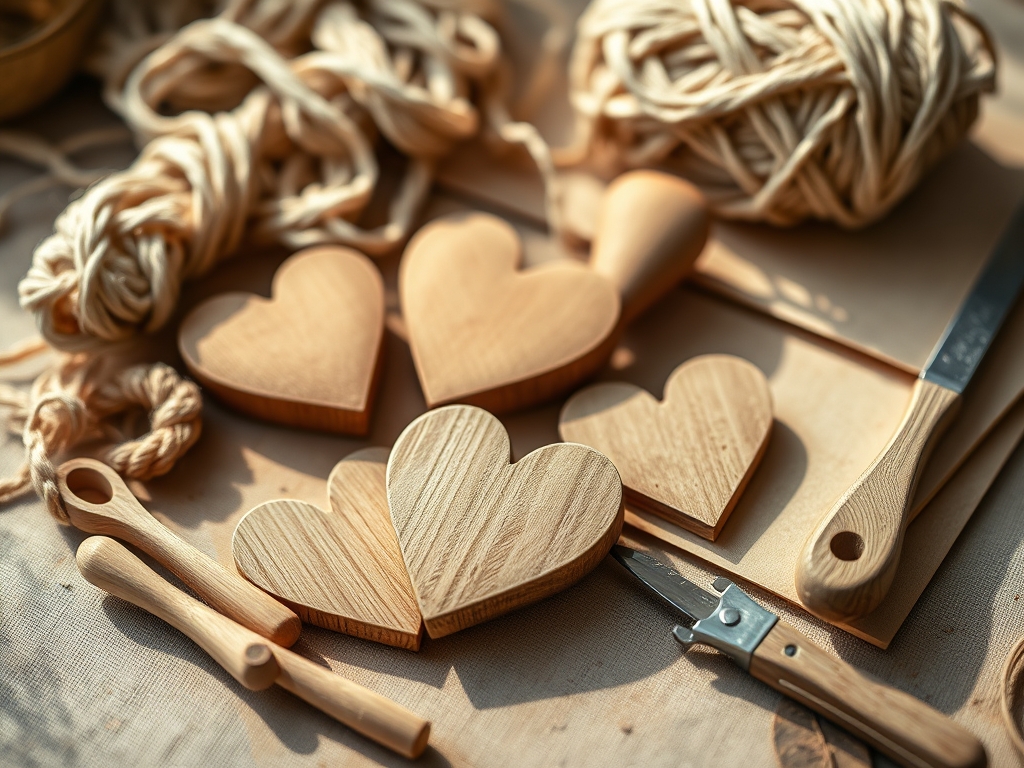
To transform a block of wood into a masterpiece, you need a kit that respects the tensile strength of your material. Your primary tool is a detail carving knife with a high carbon steel blade, which holds a razor edge longer than stainless steel. You will also need a set of digital calipers to ensure the bilateral symmetry of the heart lobes. For the finishing stages, gather sandpaper in a progression of grits from 120 up to a staggering 2000 for that glass-like sheen. You will also need a burnishing tool, such as a smooth bone folder or even a polished agate stone, to compress the surface fibers.
Material Substitutions: If you cannot find traditional carving wood, look for reclaimed orchard wood like apple or pear, which has an incredibly tight grain density. If a professional carving knife is unavailable, a high quality scalpel or a sharp pocket knife can work, though the ergonomics might be less comfortable for long sessions. For finishing oils, if you lack specialized wood tonics, food grade walnut oil or beeswax are excellent sustainable alternatives that are safe for constant skin contact.
THE TEMPO
The "Maker's Rhythm" is all about the transition from aggressive removal to delicate refinement. The initial rough out phase usually takes about thirty minutes; this is where you use high torque movements to define the silhouette. The shaping phase, where you refine the curves and the "cleavage" of the heart, requires another forty minutes of slow, deliberate paring. The longest phase is the finishing cycle. Sanding and curing can take several days if you account for the drying time between oil applications. Do not rush the capillary action. Wood is a biological sponge; it needs time to pull the finish into its internal pores to create a durable, moisture resistant barrier.
THE CORE METHOD
1. The Raw Sculpt and Symmetry
Start by sketching your heart onto the end grain of your wood block. Use your carving knife to remove the corners using "push cuts" and "pull cuts." Constantly rotate the piece to check the balance. Use your calipers to measure the thickness of the lobes at multiple points.
Mastery Tip: Always carve toward the "bottom" point of the heart. Wood fibers are like a bundle of straws; if you carve "up" toward the wide lobes, you risk splitting the grain. This is due to the cleavage strength of the wood, where the bonds between fibers are weaker than the fibers themselves.
2. Grain Raising and Leveling
Once the shape is perfect, sand the heart with 220 grit paper. Then, lightly mist the wood with water. This causes the crushed wood fibers to swell and stand up, a process known as "popping the grain." Once dry, sand them off with 400 grit.
Mastery Tip: This technique prevents the heart from feeling "fuzzy" later if it gets damp from palm sweat. By pre-raising the grain, you are ensuring dimensional stability and a permanently smooth surface.
3. The Friction Burnish
Before applying any liquid finish, take your bone folder or a hard piece of polished wood and rub the heart vigorously. You are not removing material here; you are using friction to crush the surface cells.
Mastery Tip: This is the science of lignin compression. By applying pressure, you consolidate the surface, making it harder and more reflective. A burnished heart requires less oil because the pores are physically closed.
4. The Oil Saturation
Submerge the heart in a bath of tung oil or linseed oil for ten minutes. Remove it and wipe away the excess. Let it sit for twenty four hours, then repeat.
Mastery Tip: This relies on capillary action. The oil travels deep into the tracheids of the wood, displacing air and moisture. Once the oil polymerizes (hardens), it creates a solid internal structure that prevents the wood from cracking.
5. The Wax Micro-Layer
Apply a thin coat of carnauba wax or beeswax. Buff it with a soft lint free cloth until it glows. Carnauba wax is preferred for pocket gifts because it has a higher melting point than beeswax, meaning it won't get sticky in a warm pocket.
Mastery Tip: This creates a hydrophobic barrier. The wax molecules align to repel water, protecting the wood from the salts and oils found on human skin.
6. The Final Polishing
Use a 2000 grit sanding sponge or a piece of denim to give the heart a final buff. This removes any microscopic imperfections and creates a high luster finish.
Mastery Tip: At this grit level, you are performing mechanical polishing. You are creating a surface so uniform that light reflects off it in parallel lines (specular reflection), giving the wood a deep, inner glow.
THE TECHNICAL LEDGER
Maintenance & Longevity: To keep Hand Carved Wooden Hearts in peak condition, they should be buffed with a dry cloth once a month. If the wood begins to look "thirsty" or dull, a tiny drop of mineral oil will restore the luster. Avoid extreme temperature shifts, which can cause the wood to expand and contract, leading to checks or cracks.
Material Variations:
- Sustainable: Bamboo or cork (though cork requires a different stabilizing resin).
- Recycled: Old tool handles or broken furniture legs made of oak or maple.
- Premium: Exotic burls like Amboyna or Desert Ironwood, which have incredible density and natural oils.
The Correction:
- The Gouge: If you slip and create a deep nick, do not sand it out immediately. Steam the area with a wet cloth and a soldering iron to swell the fibers back into place.
- The Flat Spot: If a curve looks "faceted," use a flexible rasp or a sanding "shoe shine" motion to round it out.
- The Sticky Finish: If the wax feels tacky, you applied too much. Use a cloth dampened with a tiny bit of mineral spirits to strip the excess, then re-buff.
Studio Organization: Store your unfinished hearts in a climate controlled container with a consistent humidity level (around 45 percent). Use a tackle box with padded compartments to prevent the hearts from clinking against each other and denting the soft wood fibers.
THE FINAL REVEAL
There is nothing quite like the moment a project transforms from a rough chunk of timber into a shimmering, ergonomic treasure. These Hand Carved Wooden Hearts are more than just gifts; they are physical manifestations of patience and physics. When you hand one to a friend, they will immediately notice the weight, the balance, and that impossible smoothness. You have successfully navigated the complexities of grain direction and cellular compression to create something that feels alive. It is a tiny piece of the forest, refined by your hands and ready to provide comfort in a pocket for years to come.
STUDIO QUESTIONS
What is the best wood for beginners?
Basswood is ideal because it has a low grain density and very little resistance to the blade. This allows you to focus on learning your cutting angles without fighting the hardness of the material. It takes detail beautifully and sands very quickly.
How do I keep my carving knife sharp?
Use a leather strop loaded with chromium oxide polishing compound. Strop your blade every fifteen minutes of active carving. This maintains the "micro-bevel" of the edge, ensuring clean shear cuts through the wood fibers without tearing or crushing them.
Can I use olive oil to finish my heart?
Avoid olive oil or vegetable oils as they are non-drying oils. They will eventually go rancid inside the wood pores, creating an unpleasant smell. Stick to polymerizing oils like tung, linseed, or food grade mineral oil which stays shelf stable.
Why did my wooden heart crack?
Cracking, or "checking," usually happens due to rapid moisture loss. If the wood dries too quickly or is exposed to high heat, the outer cells shrink faster than the core. Always dry your wood slowly and seal the end grain promptly.
How do I get a mirror finish on wood?
The secret is sanding up to very high grits (3000 plus) and using a friction polish. By spinning the wood or rubbing it rapidly, the heat melts the natural resins and waxes, creating a perfectly level, reflective surface.