
Grab your favorite mug of coffee because we are about to dive into the intoxicating world of high-end utility. There is something primal about the scent of vegetable-tanned hide hitting the air of a workspace; it is earthy, rich, and full of potential. When you are out in the field, your gear is an extension of your creative soul, but those factory-issued nylon bands are clinical and abrasive. We are here to craft Custom Leather Camera Straps that bridge the gap between rugged durability and high-fashion aesthetics. This is not just about holding a camera; it is about the physics of weight distribution and the tactile satisfaction of a hand-burnished edge. Leather is a biological marvel with a complex network of collagen fibers that offer incredible tensile strength while remaining flexible enough to contour to your neck. As we manipulate these fibers, we are essentially engineering a piece of wearable art that will outlast the digital sensor it supports. Let us get our hands dirty and build something that feels as good as the photos you take.
THE STUDIO KIT
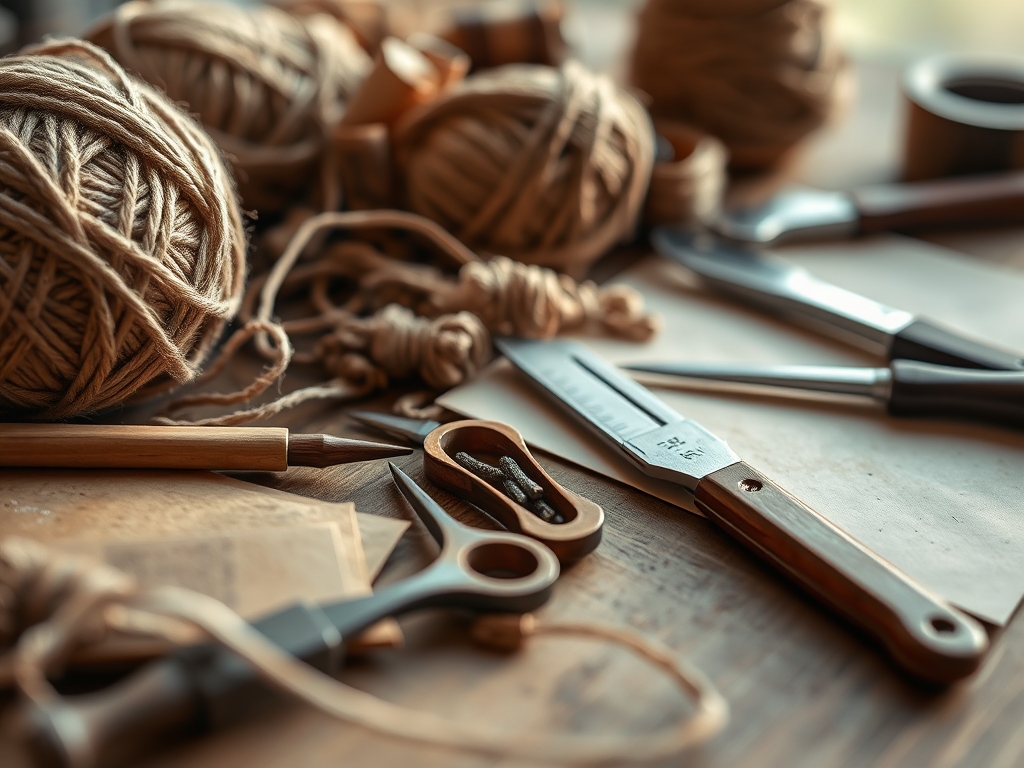
Before we make the first cut, we need to curate our workbench with precision. For these Custom Leather Camera Straps, we are targeting a 5 to 6-ounce vegetable-tanned leather. This weight provides the perfect balance of structural integrity without being overly bulky. You will need a rotary cutter for long, fluid lines and a stitching pony to hold your work while you perform a traditional saddle stitch. Our toolkit also includes a wing divider for marking consistent seam lines, a diamond awl for piercing the hide, and a bone folder to compress the fibers during assembly.
For the hardware, prioritize solid brass split rings and trigger snaps. Brass is non-ferrous, meaning it will not rust when exposed to the elements during outdoor shoots. If you cannot find high-end veg-tan, a material substitution like heavy-weight latigo works beautifully; it is infused with oils and waxes during the tanning process, making it naturally weather-resistant. Avoid chrome-tanned leathers for the main body, as they have too much stretch and can sag under the weight of a heavy telephoto lens.
THE TEMPO
The "Maker's Rhythm" is a psychological state where the mechanical repetition of crafting aligns with your creative intent. Designing Custom Leather Camera Straps is a three-phase process that requires about six hours of active labor. Phase one is the Architectural Cut, taking roughly 45 minutes to measure and slice your straps with mathematical precision. Phase two is the Preparation Grind, involving skiving, edge beveling, and burnishing, which takes about two hours. This is the most meditative part of the build.
Phase three is the Structural Assembly, where the saddle stitching happens. Depending on your speed, this can take three hours. Do not rush the stitching. The rhythm of the needles passing through the leather creates a consistent tension that prevents the thread from bunching. This slow tempo ensures that every puncture is perfectly aligned, creating a seam that is functionally superior to any machine-sewn alternative.
THE CORE METHOD
1. The Precision Longitudinal Cut
Using your calipers, measure a width of 1.5 inches for the main neck pad and 0.5 inches for the attachment leads. Secure your leather to the cutting mat and use a metal straightedge to guide your rotary cutter. Mastery Tip: Always cut with the grain of the leather, which typically runs parallel to the animal's spine. Cutting with the grain maximizes the tensile strength of the strap, ensuring it does not elongate or snap under the sudden kinetic load of a falling camera.
2. Skiving for Ergonomic Comfort
Use a skiving knife to thin the ends of the leather where they will fold over the hardware. You want to reduce the thickness by about 50 percent at the fold point. Mastery Tip: This reduction in bulk is not just aesthetic; it allows the leather to wrap tightly around the metal ring, minimizing the mechanical leverage that can cause the leather to crack over time.
3. Edge Beveling and Fiber Compression
Run an edge beveler along the sharp corners of your cut leather to create a rounded profile. Follow this by rubbing the edges with a wooden slicker and a bit of water or gum tragacanth. Mastery Tip: This process uses friction-generated heat to fuse the loose protein fibers of the leather edge together. This creates a sealed, "burnished" surface that prevents moisture from wicking into the porous center of the hide.
4. Marking the Stitch Path
Set your wing divider to 1/8th of an inch and scribe a light line along the perimeter of your strap leads. Use a pricking iron to mark your stitch spacing. Mastery Tip: Maintaining a consistent distance from the edge ensures that the load distribution across the stitches is uniform. If stitches are too close to the edge, the leather may "tear out" under high tension.
5. The Traditional Saddle Stitch
Thread two needles on a single length of waxed polyester thread. Pass them through the same hole from opposite sides, creating an interlocking "X" pattern inside the leather. Mastery Tip: The saddle stitch is a marvel of structural redundancy. Unlike a machine lockstitch, if one thread breaks, the other remains intact, preventing the entire seam from unraveling while you are on a shoot.
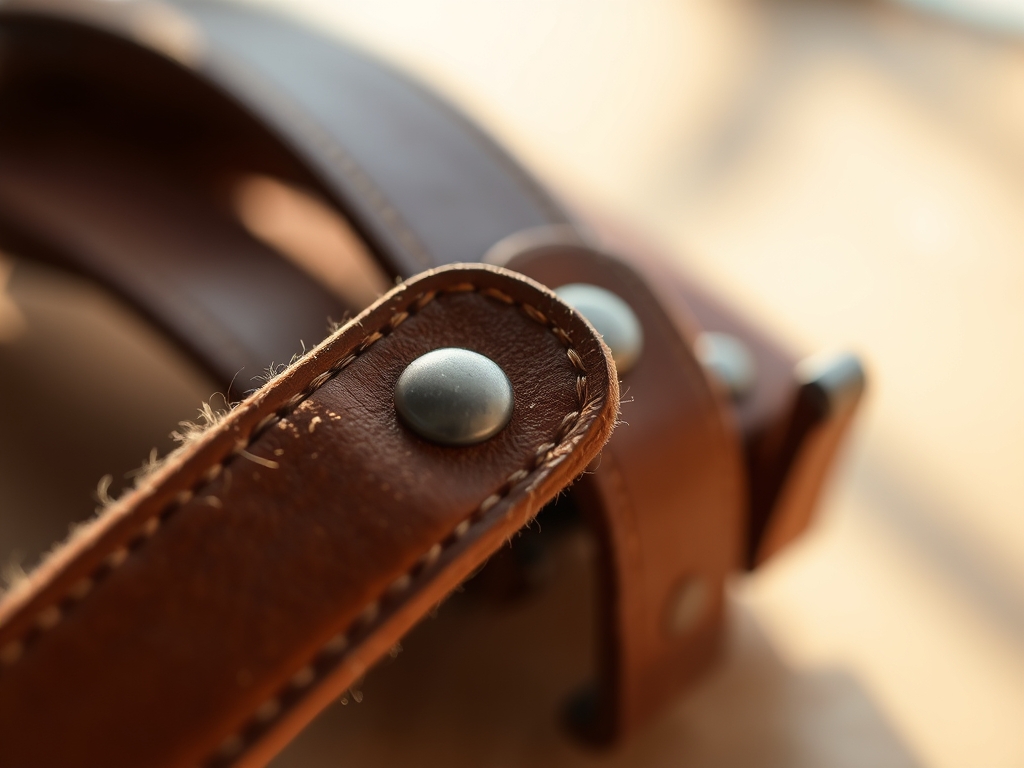
6. Hardware Integration and Riveting
Slide your brass hardware into the skived loops and secure them with copper rivets or heavy-duty stitching. If using rivets, use a rivet setter to mushroom the post. Mastery Tip: Copper rivets provide a permanent, high-shear-strength bond. The cold-forming of the copper creates a mechanical lock that is virtually impossible to pull apart without destroying the leather itself.
7. Applying the Hydrophobic Barrier
Rub a high-quality beeswax or neatsfoot oil finish into the grain side of the leather. Buff it vigorously with a lint-free cloth. Mastery Tip: This creates a capillary barrier that prevents water molecules from penetrating the leather. It also replaces the natural oils lost during the crafting process, keeping the fibers supple and preventing "dry rot."
8. The Shoulder Pad Laminate
If you are using a heavy camera, glue a secondary piece of soft suede or pigskin to the underside of the neck strap using contact cement. Mastery Tip: This lamination increases the surface friction against your clothing, preventing the camera from sliding around while you move, which reduces neck fatigue over long durations.
9. Final Burnish and Quality Control
Give the entire piece a final inspection, checking every stitch and hardware connection. Use a bone folder to smooth out any tiny imperfections in the grain. Mastery Tip: A final burnish with a high-grit sandpaper (800+) followed by a canvas cloth creates a mirror-like finish on the edges. This level of smoothness prevents the strap from snagging on delicate fabrics like silk or wool.
THE TECHNICAL LEDGER
Maintenance & Longevity: Leather is a skin; it needs to breathe. Every six months, apply a light coat of leather conditioner to maintain the elasticity of the collagen fibers. Avoid storing your strap in direct sunlight, as UV rays break down the chemical bonds in the tannins, leading to brittleness.
Material Variations: For a sustainable twist, look for cork leather or recycled rubber for the padding. If you want the ultimate luxury, English Bridle leather offers a pre-finished, waxy surface that requires almost zero break-in time.
The Correction:
- Mistake: The strap feels too stiff. Fix: Roll the leather tightly in your hands to break the "fiber glue" and increase flexibility.
- Mistake: Uneven stitching. Fix: Use a stitching groover to create a recessed channel, which guides the needles and protects the thread from abrasion.
- Mistake: Hardware is rattling. Fix: Add a small leather "washer" or "bumper" between the metal and the camera body to dampen vibration.
Studio Organization: Store your leather flat or hung on a wide peg. Never fold it sharply for long periods, as this can cause permanent fiber deformation and unsightly creases that weaken the strap's structure.
THE FINAL REVEAL
There it is. You have transformed a raw hide into a sophisticated piece of equipment. Feel the weight of it; notice how the burnished edges catch the light and how the brass hardware gleams with industrial confidence. These Custom Leather Camera Straps are more than just accessories; they are a testament to your precision and your respect for the craft. As you use this strap, it will develop a unique patina, darkening and softening as it absorbs the oils from your hands and the stories of your travels. It is a living tool that gets better with every shutter click.
STUDIO QUESTIONS
What is the best leather weight for camera straps?
A weight of 5 to 6 ounces (approx. 2.0 to 2.4 mm) is ideal. It provides enough thickness for durability and tensile strength without being too rigid or heavy for the photographer to wear comfortably during long sessions.
Can I use a sewing machine for leather straps?
While possible with an industrial machine and heavy-duty needles, a hand-sewn saddle stitch is superior. Machine stitches can unravel if a single thread breaks, whereas a saddle stitch remains secure, protecting your expensive camera equipment from accidental drops.
How do I prevent the leather from staining my clothes?
Ensure you use high-quality, drum-dyed leather and seal the edges and underside with a professional finish or "atom wax." Avoid cheap leathers with surface-only dyes, which can bleed when exposed to sweat or rain during outdoor use.
How long will a custom leather strap last?
With proper care and occasional conditioning, a well-made vegetable-tanned leather strap can last several decades. The organic fibers are incredibly resilient, and the solid brass hardware will not corrode, making it a true heirloom-quality piece of gear.

