
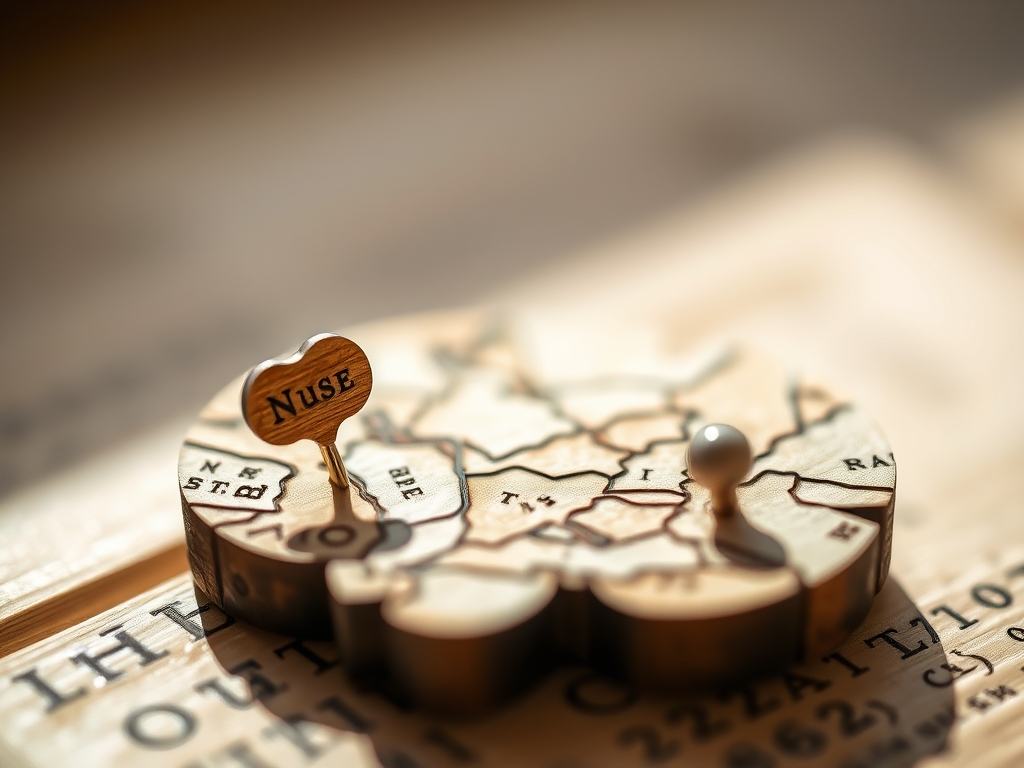
Grab your safety glasses and clear some bench space because we are about to dive into the tactile world of micro-woodworking. There is something deeply satisfying about the scent of scorched cedar and the gritty resistance of fine-grain sandpaper under your fingertips. When you create Personalized Wooden Map Pins, you are not just making stationery; you are engineering miniature monuments to your own wanderlust. We are looking for that perfect balance between structural integrity and aesthetic charm. You want a pin that feels substantial between your thumb and forefinger but possesses a needle-thin gauge that won't ruin your expensive corkboard. We are playing with density, grain orientation, and the sheer physics of adhesive bonding today. It is about taking raw, porous organic material and transforming it into a precise navigational tool. Whether you are marking a summit in the Alps or a tiny cafe in Kyoto, these pins need to withstand the mechanical stress of being pushed, pulled, and rearranged over a lifetime of travel. Let's get technical and make something beautiful.
THE STUDIO KIT
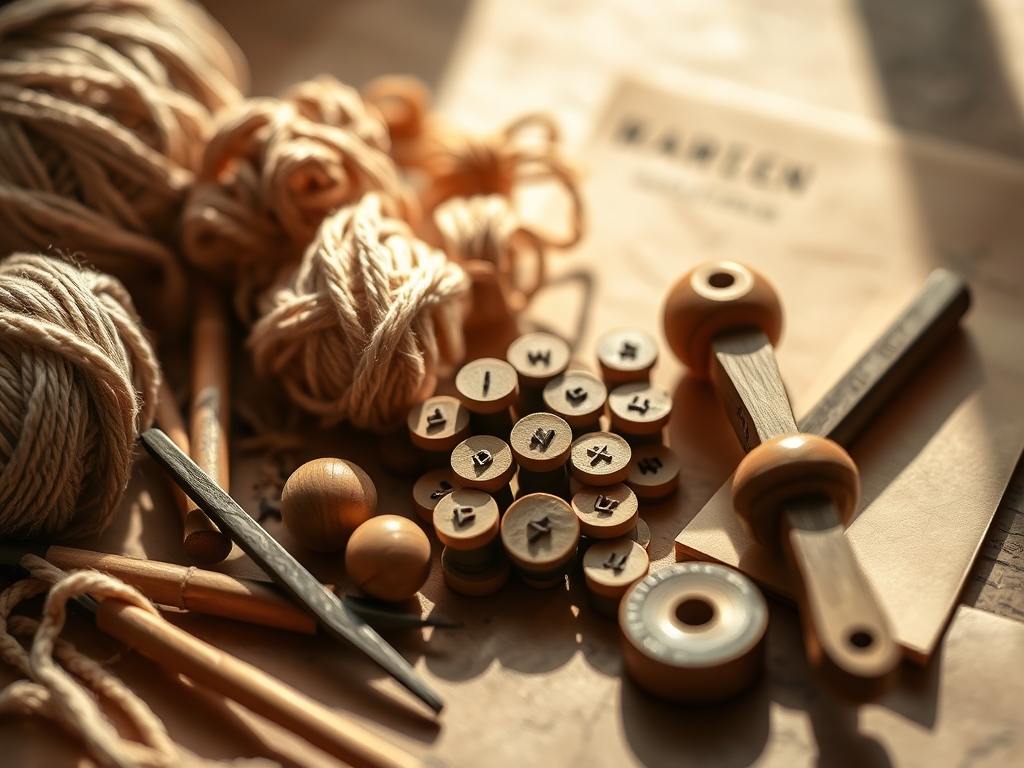
To master the art of Personalized Wooden Map Pins, your inventory must prioritize precision over bulk. You will need a high-quality jeweler's saw for intricate cuts; the fine teeth allow for a clean kerf without splintering the delicate wood fibers. Grab a set of digital calipers to ensure every pin head is uniform to within a tenth of a millimeter. For the metal components, 20-gauge stainless steel upholstery tacks or specialized map pin shanks are essential for their high tensile strength and resistance to oxidation. You will also need a variety of wood species: think dense hardwoods like maple or walnut for durability, or aromatic cedar for that sensory hit.
For the bonding phase, skip the school glue. We need a cyanoacrylate adhesive (CA glue) with a medium viscosity to bridge the gap between the porous wood and the non-porous metal. A small awl is necessary for pre-drilling pilot holes, preventing the wood from splitting along the grain line when the pin is inserted. If you cannot find specific hardwoods, material substitutions include high-density cork, compressed bamboo, or even recycled skateboard decks, which offer a stunning variegated ply look when sanded down to a finish.
THE TEMPO
The "Maker's Rhythm" for this project is all about the transition from aggressive shaping to delicate finishing. Expect to spend approximately 45 minutes on the initial material preparation: selecting your timber, checking moisture content, and ripping it into manageable strips. The fabrication phase, where you cut and shape the individual pin heads, takes about 5 to 10 minutes per piece depending on complexity.
The bonding phase is quick but requires a steady hand; give yourself 20 minutes for a batch of twenty pins. However, the true test of patience is the curing and sealing stage. While CA glue sets in seconds, a high-quality beeswax or polyurethane finish needs at least four hours to fully polymerize and lose its tackiness. Total active labor for a full set of personalized pins is roughly three hours, but the meditative flow of sanding and polishing makes the time evaporate.
THE CORE METHOD
1. Grain Selection and Strip Preparation
Start by selecting a wood scrap with a straight, tight grain. Use your jeweler's saw to cut strips that are roughly 10mm by 10mm. Observe the end grain; you want to ensure the pin shank will eventually be inserted perpendicular to the grain direction to maximize the wood's structural integrity and prevent shearing.
Mastery Tip: Wood is an anisotropic material, meaning its strength varies depending on the direction of the grain. By inserting the pin across the grain, you utilize the natural "clamping" force of the wood fibers to hold the metal shank in place.
2. Precision Shaping and Geometry
Use a fine-grit sanding block (320 to 600 grit) to shape your wooden cubes into your desired silhouette. Whether you prefer a minimalist cylinder or a geometric hexagon, consistency is key. Check your dimensions frequently with your calipers to ensure a professional, uniform look across your collection.
Mastery Tip: To achieve a perfectly symmetrical round head, use a rotary tool at a low RPM. This utilizes centrifugal force to help you sand evenly, preventing flat spots that occur with manual hand-sanding.
3. Creating the Pilot Cavity
Before introducing the metal pin, you must create a pilot hole. Use a fine-tipped awl or a micro-drill bit that is slightly smaller than the diameter of your pin shank. This removes a small amount of material to make room for the metal, reducing the internal pressure that causes hardwoods to crack.
Mastery Tip: This step manages hoop stress. Without a pilot hole, the displacement of wood fibers creates immense internal tension, which often results in a catastrophic split along the weakest grain line.
4. Adhesive Integration and Assembly
Apply a microscopic drop of CA glue into the pilot hole using a toothpick. Quickly insert the metal shank, ensuring it is perfectly vertical. Hold it steady for thirty seconds. The glue will travel into the wood pores via capillary action, creating a mechanical lock between the two materials.
Mastery Tip: Capillary action is the ability of a liquid to flow in narrow spaces without the assistance of external forces. The porous nature of the wood acts like a series of tiny straws, pulling the adhesive deep into the structure for a permanent bond.
5. Surface Burnishing and Sealing
Once the adhesive is cured, give the wood a final buffing with a bone folder or a piece of denim. This friction-heats the natural oils in the wood, bringing out a soft luster. Apply a thin layer of carnauba wax or wood butter to seal the pores and protect the Personalized Wooden Map Pins from skin oils and humidity.
Mastery Tip: Burnishing collapses the surface fibers of the wood, creating a smoother, harder exterior. This physical compaction increases the wood's resistance to moisture and wear without the need for thick, plastic-like coatings.
THE TECHNICAL LEDGER
Maintenance & Longevity: To keep your pins in top shape, avoid storing them in high-humidity environments which can cause the wood to swell and potentially loosen the adhesive bond. A light re-waxing every year will maintain the luster.
Material Variations: For a premium feel, try ebony or rosewood, which have high natural oil content and incredible density. For a sustainable approach, use reclaimed wine corks or offcuts from local luthier shops.
The Correction:
- The Split: If the wood cracks during insertion, your pilot hole was too small. Fix: Use a drill bit exactly 0.1mm smaller than the pin.
- The Fog: If the CA glue leaves a white residue (blooming), you used too much. Fix: Lightly sand the area and use an accelerant in the future for a cleaner set.
- The Wobble: If the pin is crooked, the pilot hole was angled. Fix: Use a small drill press or a centering jig to ensure a 90-degree entry.
Studio Organization: Store your finished pins in a magnetic tin or a dedicated wooden block with pre-drilled holes. This prevents the sharp tips from dulling and protects the wooden heads from impact damage during storage.
THE FINAL REVEAL
There you have it; a set of Personalized Wooden Map Pins that are as much a feat of engineering as they are a craft project. When you hold these, you can feel the weight of the hardwood and the smoothness of the burnished finish. They catch the light beautifully against a map, turning a flat piece of paper into a textured, three-dimensional history of your life's adventures. There is a profound sense of authority in pinning down a destination with a tool you built from scratch. It is tactile, it is precise, and it is quintessentially you. Now, go find your next destination and mark it with pride.
STUDIO QUESTIONS
What is the best wood for map pins?
Dense hardwoods like Maple, Walnut, or Cherry are ideal. They offer high structural integrity, meaning they won't split easily when you insert the metal shank, and they take a beautiful, smooth finish after burnishing.
How do I prevent the wood from splitting?
Always pre-drill a pilot hole using a micro-bit or a sharp awl. This displaces the wood fibers and reduces internal hoop stress, allowing the metal pin to sit securely without forcing the grain apart.
Which adhesive works best for wood-to-metal bonds?
Medium-viscosity Cyanoacrylate (CA) glue is the gold standard. It flows into the wood pores via capillary action and creates a high-strength mechanical bond with the non-porous metal shank in seconds.
Can I color the wooden pins?
Yes, use alcohol-based dyes or wood stains before sealing. Alcohol-based options penetrate deep into the fibers without raising the grain, preserving the intricate details of your Personalized Wooden Map Pins while adding vibrant color.
How do I achieve a professional shine?
Burnish the wood with a hard, smooth object like a bone folder or high-grit sandpaper. This collapses the surface fibers and generates heat, which sets the natural oils and creates a durable, high-luster finish.

