
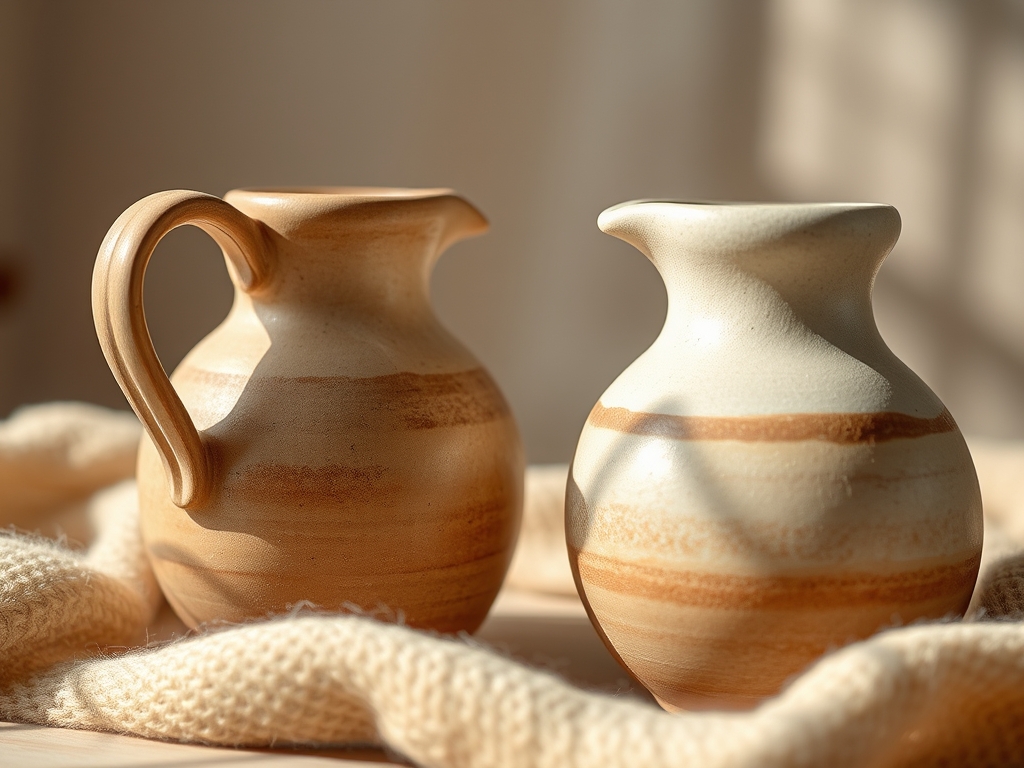
The cold, damp weight of a five pound wedge of stoneware is a sensory reset button. As you center the mass on the spinning wheel, the friction generates a subtle heat; this is the kinetic energy required to align the microscopic plate like particles of the clay body. Creating Hand Thrown Pitcher Jugs is not just about aesthetics; it is a high stakes negotiation with fluid dynamics and structural integrity. You can feel the tensile strength of the walls increasing as you pull the clay upward, thinning the profile while maintaining a sturdy base. The goal is a vessel that feels balanced in the hand but possesses the specific geometry required to direct a stream of fresh milk without a single stray droplet. We are looking for that perfect marriage of form and function where the clay reaches its plastic limit without collapsing. It is a messy, beautiful, and deeply technical process that turns a lump of earth into a functional masterpiece.
THE STUDIO KIT

To master the spout, you need a specialized arsenal. Your primary tool is the wire toggle cutter, used to decapitate the form from the bat with precision. For the delicate work of shaping the lip, a chamois cloth is essential; its soft texture compresses the rim to prevent jagged edges that disrupt laminar flow. You will also need calipers to ensure the diameter of your jug matches your intended lid or volume requirements. A serrated rib is vital for scoring the surface when attaching handles, ensuring a permanent bond through mechanical interlocking.
In terms of materials, a high fire stoneware with a fine grog content provides the best structural support for large pitchers. If you lack a professional pottery wheel, a banding wheel can serve as a manual substitute for hand building, though you will sacrifice the centrifugal symmetry of a thrown piece. For those seeking a premium finish, a porcelain slip can be applied to the exterior to create a glass like surface that resists staining from the lactic acid found in fresh milk.
THE TEMPO
The "Maker's Rhythm" is dictated by the evaporation rate of water within the clay body. You cannot rush a pitcher. The initial throwing phase takes approximately twenty to thirty minutes of high intensity focus. Following this, the piece must rest for twelve to twenty four hours until it reaches the leather hard stage. This is the golden window for trimming and spout manipulation.
If you attempt to pull a spout while the clay is too wet, the structural integrity fails and the lip will sag. If you wait until it is bone dry, the clay becomes brittle and will snap under the pressure of your thumb. The final drying phase takes three to five days, followed by a bisque fire and a glaze fire, totaling a two week production cycle. Patience is the ultimate technical skill in the ceramic studio.
THE CORE METHOD
1. Centering and Opening the Floor
Start by slamming your clay onto the center of the bat. Use your palms to exert downward and inward pressure, forcing the clay into a perfect hemisphere. Once centered, use your thumb to drill into the core, stopping about half an inch from the bottom. Mastery Tip: Maintaining a thick floor is crucial for ergonomic balance; a bottom heavy pitcher is less likely to tip over when filled to its maximum capacity with high density liquids like cream.
2. Pulling the Cylindrical Walls
With a steady hand, pinch the clay at the base and lift slowly. Your inside hand should be slightly higher than your outside hand to create a slight inward taper. This utilizes centripetal force to keep the walls from flaring out too wide. Mastery Tip: Consistent wall thickness is the key to preventing thermal shock during the firing process; uneven sections expand and contract at different rates, leading to catastrophic cracks.
3. Defining the Gallon and Rim
As the jug reaches its full height, use a metal rib to burnish the exterior. This compresses the surface particles, reducing the porosity of the clay. Shape the rim into a slight "everted" lip, which provides the foundation for your spout. Mastery Tip: A compressed rim has higher impact resistance, making the pitcher more durable for daily kitchen use where it might knock against a countertop.
4. The Classic Pointed Spout
While the wheel is stationary, place your index and middle fingers of your non dominant hand on the outside of the rim. Use the index finger of your dominant hand to gently stroke the clay outward and downward between your supporting fingers. Mastery Tip: The physics of a clean pour rely on surface tension; a sharp, downward angled edge at the tip of the spout breaks the liquid's bond, preventing it from dribbling down the front of the jug.
5. The Wide Mouth Basin Spout
For a more rustic look, use a broader stroke to create a wide, shallow dip in the rim. This is ideal for pouring thick, unhomogenized milk. Mastery Tip: A wider spout reduces the velocity of the pour, allowing for better control when filling small glasses or tea cups.
6. The Beaked Bird Spout
This involves pulling the clay further out and slightly upward before hooking the very tip downward with a wooden modeling tool. It creates a very precise, needle like stream. Mastery Tip: This design utilizes the Venturi effect to narrow the flow of liquid, which is perfect for latte art or precision baking measurements.
7. Attaching the Ergonomic Handle
Pull a separate strap of clay and let it stiffen slightly. Score both the handle ends and the jug body deeply, apply slip, and press firmly. Mastery Tip: The handle must be aligned exactly opposite the spout to maintain the center of gravity; if the alignment is off by even a few millimeters, the pitcher will feel "tippy" during the pour.
THE TECHNICAL LEDGER
Maintenance & Longevity: To ensure your Hand Thrown Pitcher Jugs last a lifetime, avoid extreme temperature swings. Never move a jug directly from a cold refrigerator to a hot dishwasher, as this triggers coefficient of expansion stress. Hand washing with a soft sponge is recommended to preserve the glaze's luster.
Material Variations: Using a recycled clay body (pugged scrap) can add unique variegated textures to your work, though it requires more effort to center. For a luxury feel, use a translucent porcelain; it is difficult to throw due to low green strength but offers a stunning, ethereal glow when held to the light.
The Correction:
- The S sag: If your spout droops, it is too wet. Use a heat gun for thirty seconds to stiffen the area before final shaping.
- The Dribble: If milk runs down the side, the spout edge is too rounded. Use a fine grit sandpaper on the bisque ware to sharpen the underside of the lip.
- Handle Detachment: If the handle cracks at the join, your "score and slip" was too dry. Ensure both surfaces are at the same moisture content before joining.
Studio Organization: Store your damp pitchers in a "wet box" (a plastic bin with a layer of wet plaster at the bottom). This creates a 100 percent humidity environment, allowing the handle and the body to equalize their moisture levels slowly, preventing differential shrinkage.
THE FINAL REVEAL
There is nothing quite like the moment you pull a finished pitcher from the kiln. The glaze has transformed into a vitrified skin, and the spout you meticulously shaped is now a permanent conduit for nourishment. When you pour that first glass of milk, notice how the liquid leaps from the ceramic edge, perfectly directed and effortlessly controlled. These Hand Thrown Pitcher Jugs are more than kitchenware; they are the physical manifestation of your technical growth and artistic intuition.
STUDIO QUESTIONS
Why does my pitcher spout always drip?
Dripping usually occurs because the leading edge of the spout is too thick or rounded. This allows capillary action to pull the liquid backward. Sharpen the underside of the spout to break the liquid's surface tension cleanly.
What is the best clay for milk pitchers?
A mid range stoneware with fine grog is ideal. It offers the necessary structural support for vertical walls while remaining smooth enough to be non porous when glazed, which is essential for food safety and hygiene.
How do I prevent my handles from cracking?
Cracking happens when the handle dries faster than the jug body. After attachment, wrap the handle in plastic film for twenty four hours to slow its evaporation rate, allowing the moisture levels to equilibrate across the entire piece.
Does the shape of the spout affect the taste?
While it doesn't change the chemical flavor, the spout shape dictates the aeration of the milk as it pours. A wider spout allows for more oxygen contact, which can subtly enhance the perceived freshness and creaminess of the milk.

