The scent of fresh vegetable tanned hide is intoxicating; it is a heady mix of earthy tannins and organic musk that signals the start of something permanent. When you hold a high quality shoulder cut, you are feeling the dense network of collagen fibers that give the material its incredible tensile strength. We are not just making a trinket today. We are crafting Custom Leather Keychain Gifts that act as a rite of passage for new drivers. Think about the physics of a car ignition. The constant vibration and the weight of a heavy key ring require a material that can withstand repetitive mechanical stress without tearing. Leather is a non Newtonian marvel in the maker world. It is flexible yet structurally sound, allowing it to age gracefully as it absorbs the oils from a driver's hands. This project is about more than just aesthetics; it is about engineering a tactile reminder of freedom that fits perfectly in a pocket. Grab your coffee and clear your workbench, because we are diving into the grit and glory of leatherwork.
THE STUDIO KIT
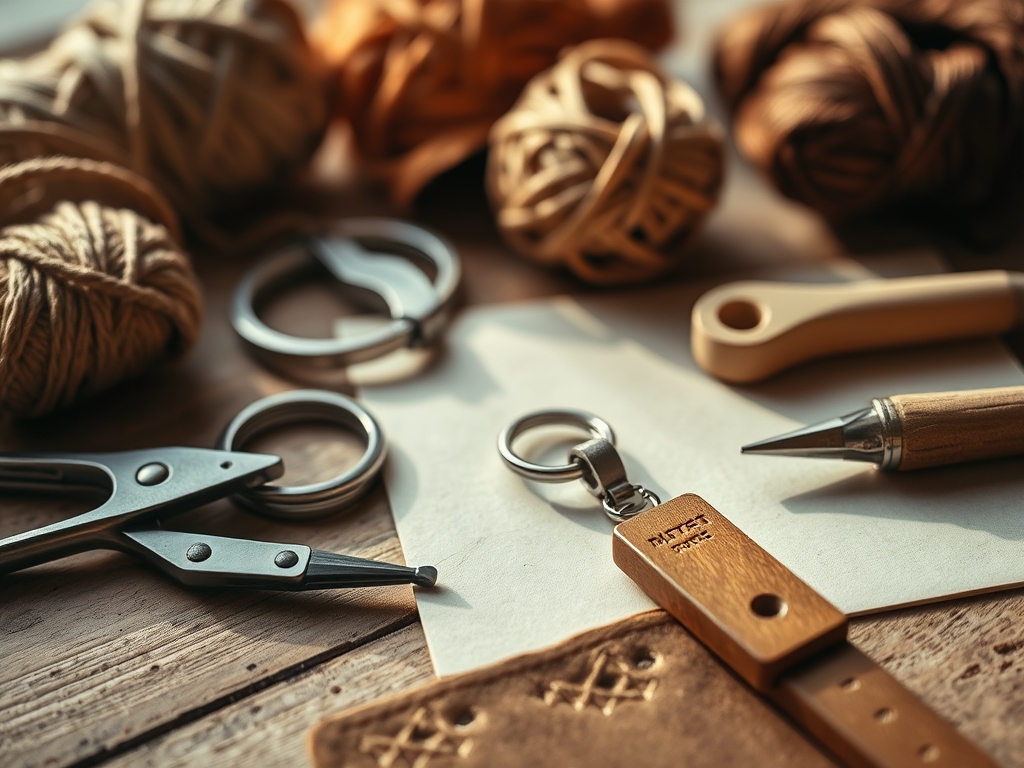
To build a professional grade accessory, you need a kit that respects the cellular structure of your hide. We are focusing on five essential tools that provide maximum leverage and precision. First, you need a rotary cutter or a sharp Japanese skiving knife. The goal is a clean, perpendicular slice through the grain side to prevent fraying. Second, a stitching chisel is non negotiable. These multi pronged forks allow you to punch consistent, angled holes that facilitate a perfect saddle stitch. Third, grab a bone folder. This simple tool uses friction to compress leather fibers, creating crisp folds and professional creases. Fourth, you need a burnishing tool, typically made of dense cocobolo wood, to seal the edges. Finally, a set of metal stamps allows for the customization that turns a strip of hide into a legacy gift.
If you cannot find a specific tool, consider these material substitutions. A heavy duty utility blade can replace a rotary cutter if you use a steel ruler to maintain a straight vector. Instead of a professional burnisher, a piece of smooth canvas or denim can generate enough heat through friction to seal the edges. For the leather itself, stick to 4 to 5 ounce vegetable tanned cowhide. This thickness provides the ideal gauge for durability without being too bulky for a pocket. Avoid chrome tanned leathers for this specific project, as they are too supple and lack the structural integrity required for deep stamping and edge burnishing.
THE TEMPO
The "Maker's Rhythm" is a psychological state where your movements become fluid and your timing is precise. For these Custom Leather Keychain Gifts, expect a total production time of about 90 minutes. The breakdown follows a logical progression of material physics. The Layout and Cutting phase takes 15 minutes; precision here saves hours of correction later. The Moistening and Stamping phase requires 20 minutes, including a short "casing" period where the water penetrates the pores of the leather. The Assembly and Stitching phase is the most meditative, taking roughly 40 minutes of focused hand work. Finally, the Finishing and Burnishing phase takes 15 minutes to transform the raw edges into a glass like surface. Respecting this tempo ensures that you do not rush the drying times, which could lead to mold or structural warping.
THE CORE METHOD
1. Precision Cutting and Geometry
Measure a strip of leather approximately one inch wide by seven inches long. Use your calipers to ensure the width is uniform across the entire length. When you use the rotary cutter, apply consistent downward pressure to slice through the dense grain and the looser corium layer in a single pass. This prevents the "stepping" effect often seen in amateur work.
Mastery Tip: Always cut with the grain direction of the hide. Leather has a natural orientation based on the animal's movement; cutting parallel to the spine ensures the highest tensile strength and prevents the keychain from stretching over time.
2. Casing for High Contrast Stamping
Before you strike a single stamp, you must "case" the leather. Lightly dampen the surface with a sponge. You are looking for the leather to return to its original color while remaining cool to the touch. This indicates that the water has reached the center of the fiber network, making it plastic and receptive to deformation.
Mastery Tip: The science here is capillary action. By hydrating the fibers, you are temporarily breaking the hydrogen bonds between collagen strands, allowing the metal stamp to displace the material permanently without cracking the surface grain.
3. The Structural Saddle Stitch
Fold the leather over your hardware and secure it with a binder clip. Use your stitching chisel and a mallet to punch holes through both layers. Thread two needles on a single length of waxed polyester thread. Pass the needles through the same hole from opposite sides, creating a locking "X" pattern inside the leather.
Mastery Tip: This is known as a saddle stitch. Unlike a machine lockstitch, if one thread breaks, the other remains intact. The wax on the thread acts as a lubricant during the sew and a sealant once the stitch is set, preventing moisture from entering the internal holes.
4. Edge Refinement and Burnishing
Trimming the edges with a beveling tool removes the sharp 90 degree corners. Apply a small amount of water or gum tragacanth to the edge. Rub the wooden burnisher rapidly back and forth along the edge until you hear a "tacky" clicking sound and see a glossy shine.
Mastery Tip: Burnishing relies on thermodynamic friction. The heat generated by the wood tool melts the natural waxes and tannins in the leather, fusing the loose protein fibers into a solid, hydrophobic barrier that protects the keychain from sweat and rain.
THE TECHNICAL LEDGER
Maintenance & Longevity: To keep the leather from becoming brittle, apply a light coat of neatsfoot oil every six months. This replenishes the internal fats that keep the collagen fibers lubricated.
Material Variations: For a sustainable twist, use "cork leather" or recycled upholstery scraps, though these will require a different edge treatment like acrylic paint. For a premium upgrade, source Shell Cordovan, which is a dense membrane from a horse hindquarter that is virtually indestructible.
The Correction:
- Mistake: The stamp impression is too shallow. Fix: Re-moisten the area and use a heavier dead blow mallet for a singular, decisive strike.
- Mistake: The edges are "hairy" after burnishing. Fix: Sand the edges with 400 grit sandpaper in one direction only before re-applying burnishing compound.
- Mistake: The thread is bunching. Fix: Ensure you are pulling both needles with equal tension to center the knot within the thickness of the leather.
Studio Organization: Store your leather flat in a climate controlled environment. Avoid UV exposure, which can "tanning" the leather prematurely, and keep it away from high humidity to prevent the growth of microorganisms in the porous fibers.
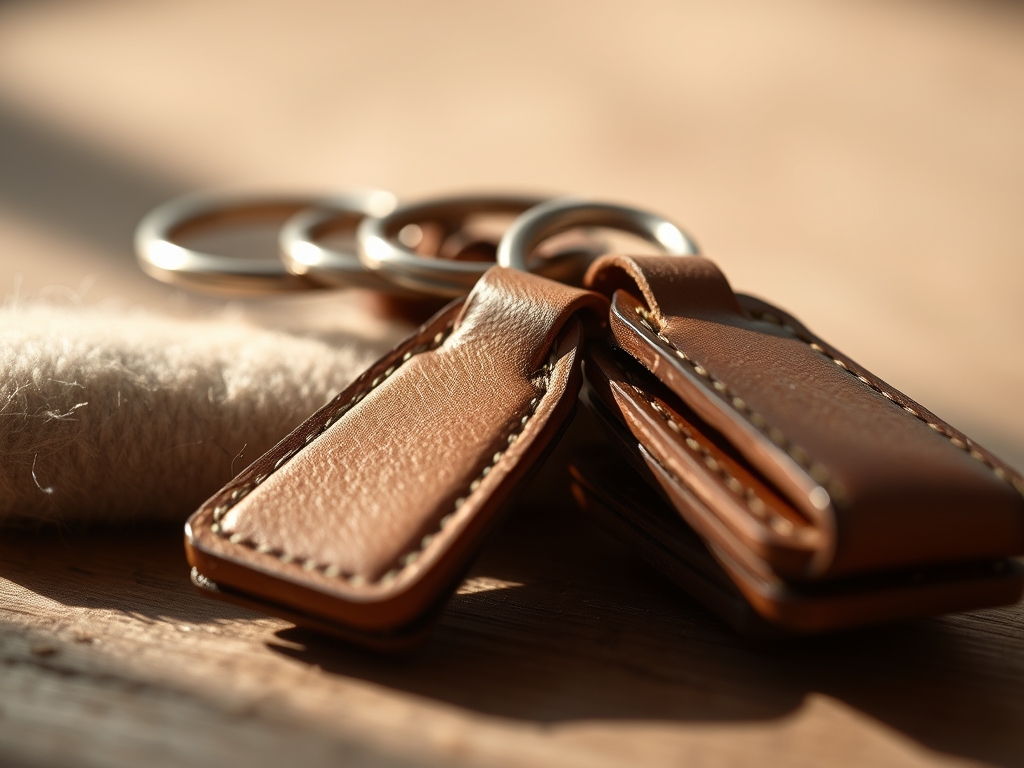
THE FINAL REVEAL
Look at that finished piece! The way the light catches the burnished edge and the deep, crisp shadows of the stamped initials makes it look like a high end boutique find. You have successfully manipulated raw protein fibers into a functional tool. These Custom Leather Keychain Gifts are not just accessories; they are tactile anchors for a new driver. They feel substantial in the hand and offer a grip that plastic simply cannot replicate. You have mastered the physics of the fold and the chemistry of the finish. Now, go give that new driver the coolest, toughest gift they will ever own!
STUDIO QUESTIONS
What is the best leather for beginners?
Vegetable tanned cowhide in a 4 to 5 ounce weight is ideal. It is firm enough to hold stamps and takes a burnish beautifully, unlike softer chrome tanned leathers which tend to flop and fray during the tooling process.
Why does my leather turn dark when I touch it?
Leather is highly porous. It absorbs the natural oils and pH from your skin. Over time, this creates a "patina," which is a chemical change that actually hardens the surface and protects the material from environmental degradation.
Can I use a regular sewing machine for this?
Most domestic machines cannot handle the gauge and density of 5 ounce leather. The needle will likely deflect or snap. Hand stitching with a saddle stitch is significantly stronger and provides a much more professional, artisanal aesthetic.
How do I fix a crooked stamp?
Unfortunately, stamping is permanent deformation of the fibers. However, you can sometimes "mask" a slight misalignment by adding decorative border stamps or using a damp bone folder to gently blend the surrounding area, though precision in the layout phase is always best.