
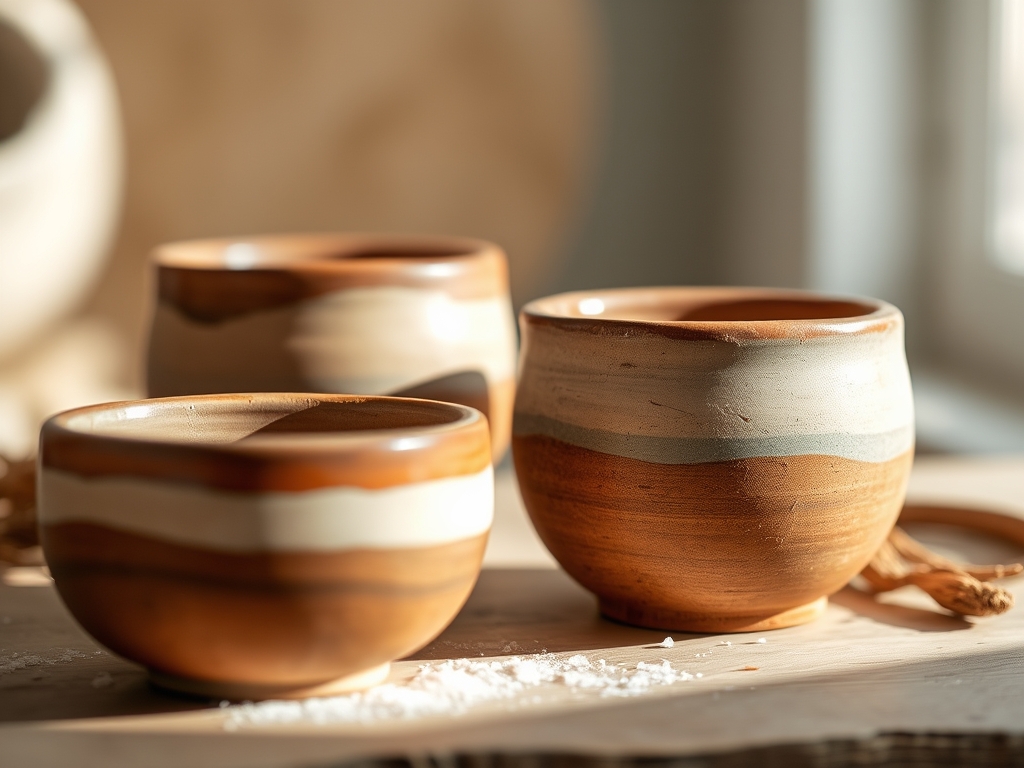
Imagine the gritty, cool sensation of raw stoneware sliding against your palms as the potter's wheel hums a steady bass note in the background. We are diving into the tactile world of Hand Thrown Salt Cellars; those essential, sculptural vessels that transform a mundane pinch of sodium into a culinary event. It is about the friction between the clay and the tool, the way moisture leaves the surface through evaporation, and the structural integrity of a perfectly pulled rim. We are not just making dishes; we are engineering small scale storage solutions that balance moisture absorption with aesthetic grace. Grab your apron and tie your hair back because we are about to get intimate with mineral physics and the sheer joy of creating something functional from a lump of earth.
THE STUDIO KIT
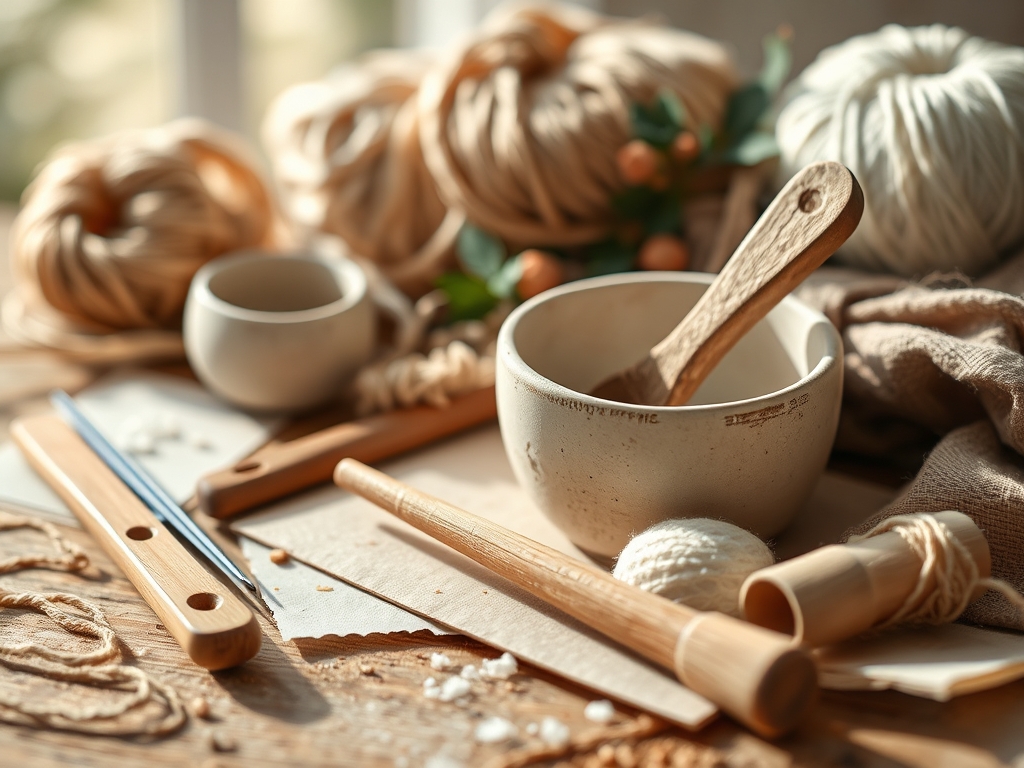
To master the art of the salt cellar, you need a kit that respects the tensile strength of your medium. For the cellars themselves, a high fire stoneware with a fine grog content is ideal; the grog provides a structural skeleton that prevents warping during the firing process. You will need a wire clay cutter for portioning, a metal rib for compressing the exterior walls, and a caliper to ensure each vessel in your set maintains a consistent diameter. For the five tiny scoops, we are pivoting to hardwoods like cherry or black walnut. These woods possess a high fiber density, meaning they will not splinter when carved into delicate, ergonomic shapes. You will need a hook knife for hollowing the bowl of the scoop and a jeweler's saw for the initial profile cuts.
If you cannot find cherry wood, a material substitution of olive wood works beautifully due to its high natural oil content, which resists the corrosive nature of salt. For the clay, if stoneware is unavailable, a porcelain body offers a refined finish but requires a higher level of moisture management during the throwing phase to prevent collapse. Always keep a natural sea sponge and a bowl of slurry nearby to maintain the lubrication of the clay surface without oversaturating the base.
THE TEMPO
The "Maker's Rhythm" is a dance with time and physics. You cannot rush the dehydration cycle. The initial throwing of the five cellars takes approximately sixty minutes; this includes centering the mass and pulling the walls to a uniform gauge. Once thrown, the pieces must sit for twenty four hours to reach a "leather hard" state. This is the sweet spot where the clay has lost enough water to be handled but retains enough flexibility to be trimmed.
Carving the five tiny scoops is a slower, more meditative process. Expect to spend forty five minutes per scoop. This involves the rough out, the refined carving of the ergonomic handle, and the final sanding. The total project duration, including the two separate kiln firings (bisque and glaze) and the wood finishing, spans about ten to fourteen days. Patience is your most important tool; rushing the drying phase leads to thermal shock and cracks that can ruin a week of work.
THE CORE METHOD
1. Centering and Opening the Mass
Start by slamming your clay onto the center of the wheel head to create a mechanical bond. As the wheel spins, use the heel of your hand to push the clay toward the center. This aligns the platelet structure of the clay, ensuring it spins without a wobble. Once centered, press your thumb into the middle to create a well, leaving about half an inch at the bottom for the foot.
Mastery Tip: This stage is all about centrifugal force. If your hands move even a millimeter off center, the clay will follow. Keep your elbows locked against your hips to use your body weight as a stabilizer rather than relying on arm strength alone.
2. Pulling the Walls
Place one hand inside the well and the other on the outside. Apply even pressure as you lift your hands upward. This action stretches the clay, thinning the walls while increasing the height. Aim for a slightly tapered shape that keeps the salt protected from kitchen splatters. Use your calipers to check that each of the five cellars matches in width.
Mastery Tip: Monitor the hydrostatic pressure within the clay walls. If you pull too fast, the clay will tear. If you pull too slow, the water will soften the clay too much, causing the vessel to slump under its own weight.
3. Trimming the Foot
Once the cellars are leather hard, flip them over on the wheel. Use a loop tool to shave away excess clay from the bottom. This creates a "foot ring" which reduces the surface area touching the table and prevents the glaze from sticking to the kiln shelf.
Mastery Tip: Trimming is essentially subtractive engineering. By removing mass from the base, you lower the center of gravity, making the salt cellar more stable and less likely to tip over during a busy dinner service.
4. Carving the Hardwood Scoops
Sketch your scoop profile onto a thin slat of wood, ensuring the grain direction runs parallel to the handle for maximum strength. Use a jeweler's saw to cut the silhouette. With your hook knife, slowly hollow out the bowl of the scoop using shallow, sweeping motions. Finish by sanding with progressively finer grits, from 120 up to 400.
Mastery Tip: Understanding shear strength is vital here. If you carve against the grain, the wood will "tear out," leaving a rough surface. Always carve with the grain to maintain the integrity of the wood fibers and achieve a glass like finish.
5. The Final Burnish and Oil
For the wooden scoops, apply a food safe mineral oil or beeswax. Use a bone folder or a smooth stone to burnish the wood after oiling; this compresses the surface fibers, creating a natural luster and a moisture barrier. For the cellars, apply a food safe glaze and fire to the recommended temperature.
Mastery Tip: The capillary action of the wood will draw the oil deep into the pores. This creates a hydrophobic barrier that prevents the salt from drawing moisture out of the wood, which would otherwise cause the scoop to become brittle over time.
THE TECHNICAL LEDGER
Maintenance & Longevity: To keep your Hand Thrown Salt Cellars in peak condition, hand wash only. The high heat and harsh chemicals of a dishwasher will degrade the wooden scoops and can eventually craze the glaze on the stoneware. Re oil the scoops every six months to maintain their supple texture.
Material Variations: If you want a premium feel, try a "black mountain" clay body which fires to a deep metallic chocolate color. For a sustainable approach, source "orchard wood" from local trimmings for your scoops; apple and pear wood are incredibly dense and offer beautiful variegated grain patterns.
The Correction:
- The S Curve Crack: Usually caused by uneven drying. Fix it by slowing down the drying process using a "damp box" or covering the pieces loosely with plastic.
- Rough Scoop Texture: If the wood feels "fuzzy" after the first wash, the grain has raised. Fix this by "popping the grain" with a mist of water, letting it dry, and sanding it one last time before the final oiling.
- Wobbly Base: If the cellar rocks on the table, the foot was not trimmed flat. Use a diamond sanding pad on the fired ceramic to level the base.
Studio Organization: Store your unfinished clay pieces in a sealed plastic bin with a damp sponge to maintain ambient humidity. Keep your wood blanks in a cool, dry place away from direct sunlight to prevent checking or splitting before you have a chance to carve them.
THE FINAL REVEAL
There is a profound satisfaction in seeing a row of five Hand Thrown Salt Cellars lined up on a linen tablecloth. The contrast between the cool, glazed ceramic and the warm, burnished hardwood of the scoops is a masterclass in material harmony. These pieces are more than just kitchen tools; they are a testament to your understanding of physics, friction, and form. When your guests reach for a pinch of Maldon, they will feel the weight and the intentionality behind every curve and every polished edge. You have successfully turned raw earth and timber into a legacy set for the dining table.
STUDIO QUESTIONS
Why is stoneware better than porcelain for salt?
Stoneware is generally more porous than porcelain before glazing, which helps regulate micro moisture. It is also more durable for daily use, resisting the chips and dings that happen in a high energy kitchen environment.
How do I prevent the wooden scoop from snapping?
Ensure the grain direction runs the full length of the handle. If the grain runs diagonally, the handle becomes a structural weak point. High fiber density woods like maple or walnut also provide better tensile strength.
What is the best glaze for a salt cellar?
Always use a food safe, lead free glaze. Matte glazes are popular for their tactile feel, but glossy glazes are easier to clean. Ensure the glaze is "stable" so it does not react with the salt's acidity.
Can I use an oscillating tool for carving?
Yes, an oscillating tool with a sanding attachment can speed up the shaping process. However, for the delicate bowl of the scoop, hand tools provide better control and prevent you from removing too much material too quickly.

