

The scent of aged vellum and the crisp, starchy snap of antique lace are the only invitations you need to begin this journey. When you hold a vintage Bible, you are touching history; when you add Hand Stitched Bookmark Ribbons, you are weaving your own narrative into that timeline. This is not just about aesthetics. It is about the tactile friction between a silk weave and a gold-edged page. We are looking for a specific tensile strength that allows the ribbon to drape without curling, ensuring that the delicate fibers do not snag on the thin paper. You want a material that feels substantial yet remains thin enough to avoid warping the spine. Think of this as structural engineering for the soul. We are balancing the porous nature of cotton lace with the high-sheen durability of double-faced satin. Every stitch you pull through the header is a calculated tension point designed to last for decades of daily use. Grab your favorite mug of tea; we are diving into the physics of grace.
THE STUDIO KIT
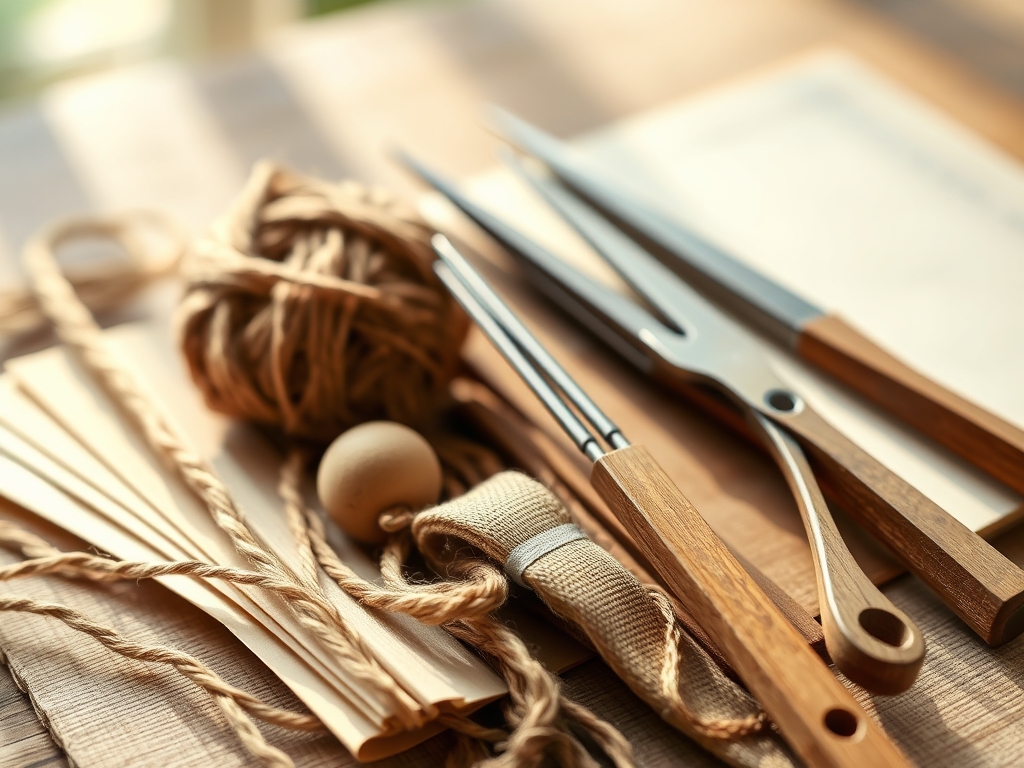
To execute these ribbons with professional precision, you need a kit that respects the fragility of the materials while providing the torque necessary for a secure finish. Start with a pair of high-carbon steel embroidery scissors for micro-cuts that do not fray the lace edge. You will also need a size 10 sharps needle, which has a narrow eye to minimize the puncture diameter in the silk. For the base, select a double-faced polyester or silk satin ribbon with a high thread count to ensure the grain does not shift during stitching.
The lace selection is the heart of the project. You should source six specific styles: Valenciennes lace for its round mesh and floral density; Cluny lace for a heavier, geometric weight; Chantilly lace for its ethereal, fluttering edges; Point d'Esprit for a playful dotted texture; Crochet lace for a rustic, sturdy feel; and Guipure lace for a bold, motif-based structure.
Material Substitutions: If you cannot find authentic silk ribbon, a high-quality rayon seam binding offers a similar drape but with a more matte finish. If you lack a traditional thimble, a small piece of surgical tape on your pushing finger provides the necessary grip and protection without sacrificing tactile feedback.
THE TEMPO
The "Maker's Rhythm" is a state of flow where your breath matches the cadence of the needle. For a set of Hand Stitched Bookmark Ribbons, expect to spend approximately fifteen minutes on material preparation, including measuring the Bible's height and calculating the "tail" length. The actual stitching of the lace headers takes about twenty minutes per ribbon. Finally, allow ten minutes for the burnishing and finishing of the ribbon ends to prevent unraveling. Total project time sits comfortably at around two hours for a full set of six. Do not rush the piercing phase; the slower the needle movement, the more control you have over the fiber displacement.
THE CORE METHOD
1. Calculating the Structural Length
Measure the height of your book from the head to the tail of the spine using a precision ruler. Add exactly four inches to this measurement. This extra length accounts for the "turn-under" at the top and a graceful two-inch overhang at the bottom. Mastery Tip: This calculation relies on the coefficient of friction. A ribbon that is too short will slip out of the book when handled, while a ribbon that is too long creates unnecessary leverage that can tear the delicate page edges.
2. Prepping the Ribbon Terminus
Use a rotary cutter on a self-healing mat to achieve a perfect 45-degree angle at the bottom of your ribbon. This angle distributes the stress across the weave, significantly reducing the likelihood of a lateral fray. Mastery Tip: Applying a microscopic amount of clear cyanoacrylate or a specialized fray-check solution to the very edge utilizes capillary action. The liquid travels just far enough into the fibers to lock them without making the ribbon stiff or brittle.
3. Aligning the Lace Overlay
Position your chosen lace (let us start with the Valenciennes) at the top edge of the ribbon. Use fine-gauge dressmaker pins to secure it. Ensure the lace is centered so the tension remains even across the horizontal axis. Mastery Tip: Observe the grain direction of both the ribbon and the lace. If the grains are misaligned, the bookmark will develop a permanent twist or "torque" over time, preventing it from laying flat against the page.
4. Executing the Whipstitch Header
Using a single ply of mercerized cotton thread, begin a series of tiny whipstitches across the top. Keep your stitches approximately 1.5mm apart. This creates a reinforced hinge that allows the ribbon to move freely within the book's binding. Mastery Tip: Maintain consistent tensile pull on your thread. If one stitch is tighter than the rest, it creates a "pucker point" that concentrates stress and leads to premature fiber failure in the silk ribbon.
5. Securing the Anchor Knot
Finish your stitching by burying the knot between the layers of lace and ribbon. Use a bone folder to press the stitched area flat, ensuring there are no lumps that could indent the paper. Mastery Tip: This process is known as mechanical bonding. By flattening the fibers, you increase the surface area contact between the thread and the fabric, which stabilizes the assembly against the shearing forces of opening and closing the book.
THE TECHNICAL LEDGER
Maintenance & Longevity: To keep your ribbons pristine, avoid touching the lace with oils or lotions on your hands. If the lace becomes soiled, use a soft-bristled brush and a dry-cleaning solvent rather than water to prevent the fibers from swelling and losing their crispness.
Material Variations: For a sustainable approach, seek out GOTS-certified organic cotton lace or repurposed vintage handkerchiefs. Premium options include hand-dyed silk ribbons colored with botanical pigments, which offer a unique variegated aesthetic that mimics the natural aging of old manuscripts.
The Correction:
- The Pucker: If the ribbon ripples, your stitches are too tight. Snip the thread and restart with a lighter tension.
- The Fray: If the bottom edge sheds, you likely used dull scissors. Recut with a fresh blade to ensure a clean shear.
- The Slip: If the lace slides off-center, use a temporary fabric adhesive stick to tack it down before you start sewing.
Studio Organization: Store your completed ribbons flat in an acid-free archival box. Avoid rolling them, as this can create "memory" in the fibers, causing the ribbon to curl away from the page when in use. Keep them away from direct UV light to prevent the fading of the delicate lace patterns.
THE FINAL REVEAL
There is nothing quite like the moment you slide a finished ribbon into a cherished Bible. The way the Cluny lace adds a bit of architectural weight or how the Chantilly whispers against the gold leaf is pure magic. You have transformed simple materials into a functional tool of devotion. These Hand Stitched Bookmark Ribbons are more than just placeholders; they are tactile reminders of the time and care you put into your craft. They feel balanced, look professional, and are engineered to endure.
STUDIO QUESTIONS
What is the best thread for lace?
Use 50-weight mercerized cotton or silk thread. These materials offer high tensile strength and a low profile, ensuring the stitches remain nearly invisible while providing a durable bond that withstands the friction of frequent page-turning.
How do I prevent ribbon fraying?
Cut the ribbon at a 45-degree angle using micro-serrated shears. For added security, lightly treat the edge with a specialized fabric sealant or a very brief heat-seal if using synthetic fibers to lock the weave.
Can I use vintage lace?
Yes, but check for fiber degradation first. Gently tug the lace; if it crumbles or snaps, the cellulose has broken down. If it holds, stabilize it with a light steam press before stitching it to your ribbon base.
What ribbon width is ideal?
A width of 5/8 inch to 7/8 inch is standard. This size provides enough surface area for intricate lace detailing without being so bulky that it puts pressure on the book's binding or obscures the text on the page.

