
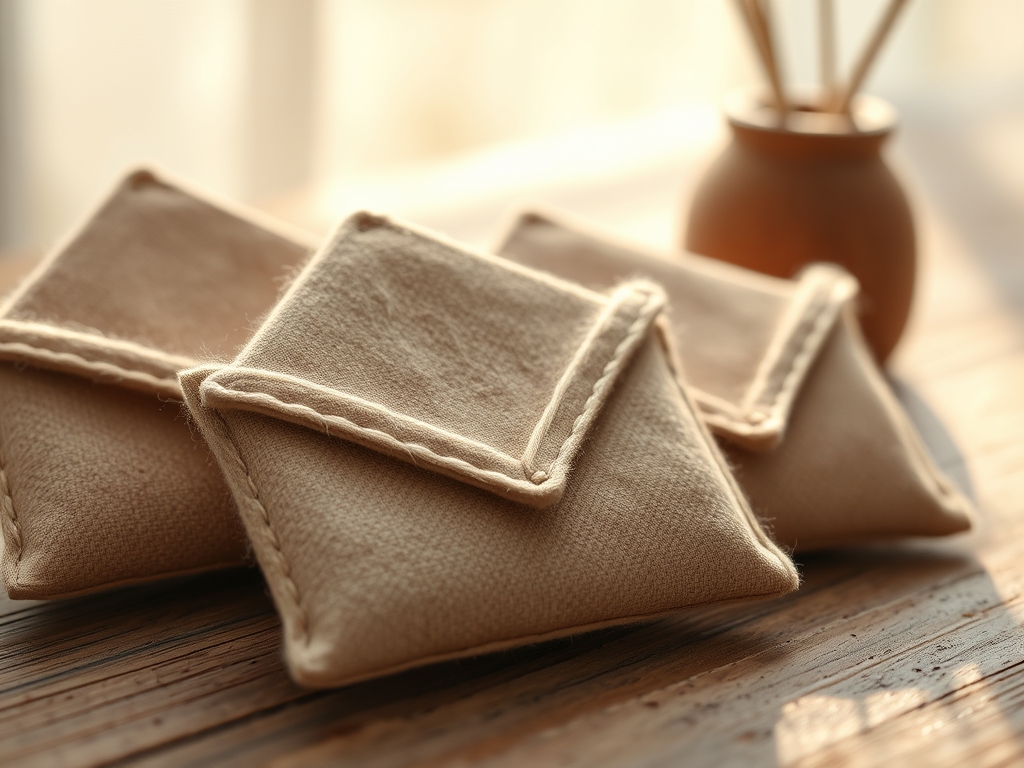
Close your eyes and listen to the crisp, rhythmic snap of a rotary blade slicing through a high-thread-count cotton weave. There is a specific, visceral satisfaction in the resistance of the fibers before they give way to a clean edge. When you transition from mass-produced paper to Hand Stitched Fabric Envelopes, you are not just wrapping a gift; you are engineering a tactile experience that defies the disposable culture of modern gifting. The weight of the textile, the slight friction of the thread against the weave, and the structural integrity of a well-placed seam create a sensory bridge between the giver and the receiver. We are talking about the intersection of material science and high-end aesthetics. Each envelope acts as a miniature vault, protecting the gift card within through the natural tensile strength of interlocking warp and weft. As you handle the fabric, you will notice the way light interacts with the grain; this is the physical manifestation of craftsmanship. It is time to stop settling for flimsy envelopes and start building something that feels substantial, permanent, and undeniably cool.
THE STUDIO KIT
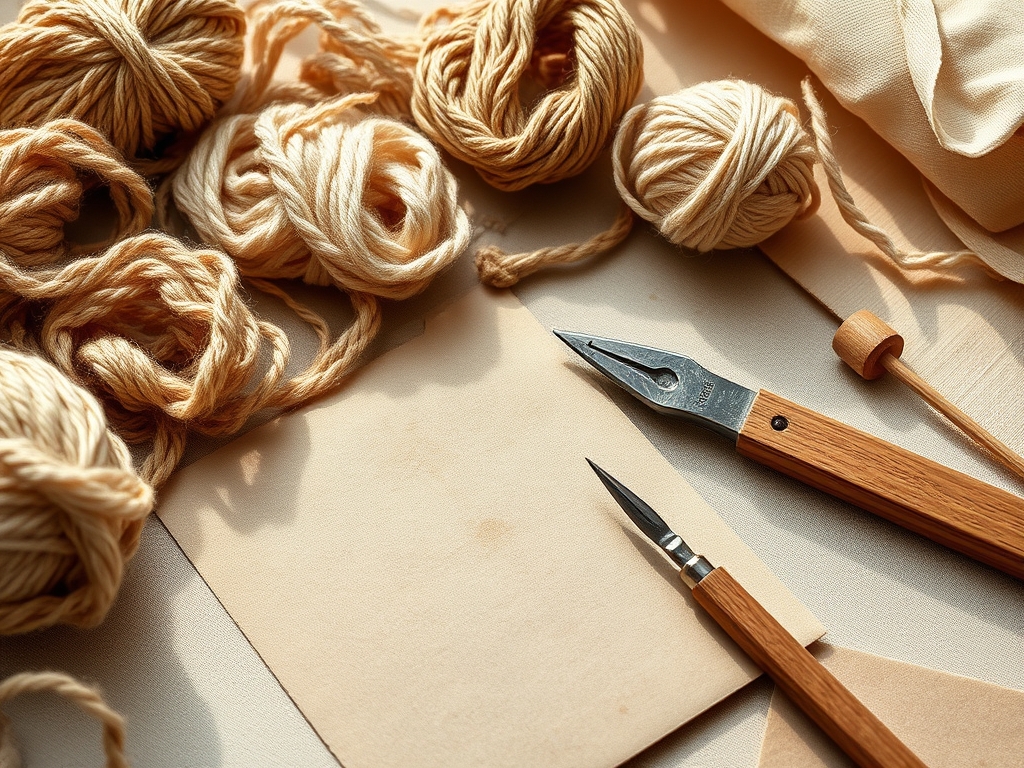
To master the construction of Hand Stitched Fabric Envelopes, your workstation requires tools that respect the physics of the textile. You will need a self-healing cutting mat to provide a stable surface for high-pressure cuts. A 45mm rotary cutter is essential for maintaining a consistent edge without the jagged distortion often caused by traditional shears. For the structural assembly, select a high-gauge embroidery needle and waxed polyester thread. The wax reduces friction as the needle passes through the porous layers, preventing heat buildup and fiber fraying. You should also have a bone folder on hand to burnish your creases; this tool compresses the cellulose or protein fibers at the fold line, ensuring the envelope lies flat without losing its structural memory.
Material Substitutions: If you lack heavy-duty canvas, you can reinforce lightweight quilting cotton by applying a fusible interfacing. This increases the material density and prevents the "sag" that occurs when gravity acts on low-denier fabrics. For a more industrial look, consider using recycled Tyvek or washable kraft paper, which offer incredible tear resistance while maintaining a leather-like tactile quality after being worked by hand.
THE TEMPO
The construction of a professional-grade fabric envelope follows a specific Maker's Rhythm that cannot be rushed without compromising the finish. Expect to spend approximately ten minutes on the Architectural Phase, which includes measuring, marking with a tailor's chalk, and precision cutting. The Assembly Phase, where the hand-stitching occurs, typically requires twenty to thirty minutes depending on your stitch density. Finally, the Finishing Phase takes about five minutes to trim loose ends and steam-set the folds. This cadence allows the maker to enter a flow state where the repetitive motion of the needle becomes an exercise in precision and mindfulness.
THE CORE METHOD
1. The Template Alignment
Begin by calculating the dimensions of your gift card and adding a 0.5-inch seam allowance on all sides. Use your calipers or a metal ruler to ensure the lines are perfectly perpendicular to the fabric grain. Cutting "on the grain" is vital because it utilizes the natural alignment of the threads to prevent the envelope from warping or twisting over time.
Mastery Tip: Understand the tensile strength of your weave. If you cut on the bias (diagonally), the fabric will stretch significantly under tension. By cutting parallel to the selvage, you harness the maximum stability of the loom-set threads.
2. The Structural Fold
Place your fabric face down and fold the bottom edge up to create the pocket. Use your bone folder to apply firm, even pressure along the crease. This mechanical action breaks the internal bonds of the fibers just enough to hold a new shape without snapping the individual filaments.
Mastery Tip: This process utilizes structural memory. By compressing the fibers at the fold, you are creating a permanent hinge that resists the natural tendency of the textile to return to its flat, original state.
3. The Blanket Stitch Edge
Secure the sides using a blanket stitch or a saddle stitch. Pass the needle through both layers, ensuring the spacing is mathematically consistent. A consistent stitch length is not just for looks; it distributes the stress of the contents evenly across the entire seam, preventing a single point of failure.
Mastery Tip: This relies on load distribution. By maintaining a uniform distance between stitches, you ensure that the outward pressure of the gift card is shared by every loop of thread, rather than straining the fabric at the corners.
4. The Closure Mechanism
For the final touch, sew a small button or a magnetic snap to the flap. If using a button, create a thread shank by wrapping the thread around the base of the button before knotting. This provides the necessary clearance for the flap to sit flush against the body of the envelope.
Mastery Tip: This involves clearance physics. Without a shank, the button would pull the fabric too tight, causing puckering. The shank allows the layers to nestle together, maintaining the sleek profile of the finished piece.
THE TECHNICAL LEDGER
Maintenance & Longevity: To ensure your Hand Stitched Fabric Envelopes last for years, avoid washing them in high-heat cycles which can degrade the wax on the thread. Spot clean with a damp cloth to maintain the fiber integrity.
Material Variations:
- Sustainable: Organic hemp canvas provides a rugged, high-friction texture.
- Recycled: Repurposed denim offers excellent weight and a built-in aesthetic patina.
- Premium: Silk dupioni provides a high-luster finish but requires a finer gauge needle to prevent snagging.
The Correction:
- Problem: Fabric puckering along the seam. Fix: Reduce your thread tension; the thread should sit on the surface, not dig into it.
- Problem: Fraying edges. Fix: Use a fray check solution or a tight overcast stitch to lock the raw edges.
- Problem: The envelope won't stay closed. Fix: Re-burnish the top fold with a warm iron to reset the fiber's hydrogen bonds.
Studio Organization: Store your fabric scraps and finished envelopes in a UV-protected, airtight container. Prolonged exposure to sunlight can cause "photodegradation," weakening the fibers and fading the dyes, while humidity can cause natural fibers to swell and lose their crispness.
THE FINAL REVEAL
The result of this technical process is a masterpiece of micro-engineering. When you slide a gift card into one of these Hand Stitched Fabric Envelopes, you can feel the precision of the fit. The weight in your hand, the subtle sheen of the waxed thread, and the crispness of the burnished edges all signal that this is an object of value. It transforms a simple monetary gift into a tactile keepsake that the recipient will likely keep long after the card is spent. You have successfully merged the laws of physics with the art of the handmade.
STUDIO QUESTIONS
What is the best fabric for beginners?
Mid-weight cotton canvas or denim is ideal. These materials have a stable weave and high friction, which prevents the fabric from slipping while you execute your stitches, ensuring better control and structural integrity.
Why does my thread keep tangling?
This is usually caused by static electricity or thread memory. Use a shorter length of thread (about 18 inches) and run it through a piece of beeswax to smooth the microscopic scales on the thread surface.
Can I use a sewing machine instead?
While possible, hand stitching allows for variable tension control that a machine cannot replicate. Hand stitching also permits the use of heavier thread gauges that would jam a standard home sewing machine bobbin.
How do I stop the corners from poking out?
Use a technique called mitered corners. By trimming a small triangle of excess bulk from the interior seam allowance before folding, you allow the fabric to lay flat without creating a structural bulge.
How do I choose the right needle?
Match the needle gauge to your thread weight. The needle must create a hole large enough for the thread to pass through without resistance, but small enough that the fabric fibers close back around the stitch.

