

Close your eyes and listen for that specific, heavy thud of a high quality hide hitting the workbench. It is the sound of potential. When you are out in the wild catching the light for a landscape piece, your tools need to be as resilient as your vision. We are diving deep into the architecture of Custom Leather Sketchbook Covers today. This is not just a simple wrap; it is a structural masterpiece designed to withstand charcoal dust, spilled turpentine, and the crushing weight of a travel bag. We are looking for that perfect intersection of tactile luxury and rugged durability. Think of this as building a suit of armor for your creative soul. Every square inch of the leather has a story told through its grain density and pore structure. We are going to manipulate those physical properties to create something that feels like an extension of your own hand. Grab your favorite caffeinated beverage and clear the table. We are about to turn raw, fibrous material into a legacy object that smells like cedar and ambition.
THE STUDIO KIT
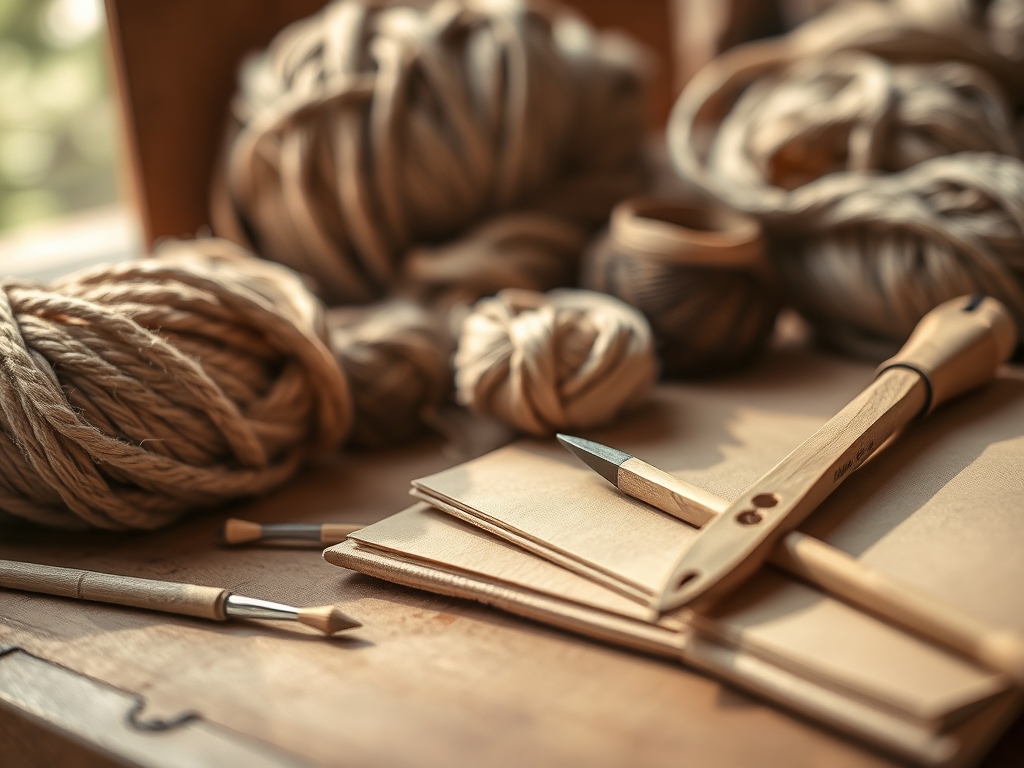
THE STUDIO KIT
To master the art of Custom Leather Sketchbook Covers, you need tools that respect the tensile strength of the hide. Start with a 5 to 6 ounce vegetable tanned leather; this thickness provides the necessary rigidity without becoming cumbersome. You will need a precision rotary cutter with a tungsten carbide blade to ensure clean edges that do not fray the internal protein fibers. A bone folder is essential for creating crisp, permanent creases by compressing the leather cells. For the stitching, fetch a diamond-point awl and 0.8mm waxed polyester thread. The wax reduces friction during the pass through, preventing heat buildup that can weaken the thread.
Material Substitutions: If you cannot source traditional veg-tan, a heavy cork fabric or recycled bonded leather can work, though they lack the same hygroscopic properties that allow real leather to patina. For adhesives, a water-based contact cement is preferable over toxic solvents; it creates a flexible bond that moves with the material rather than cracking under stress. Keep a pair of digital calipers nearby to measure your "stack height" as we add layers. Precision is the difference between a hobbyist project and a professional tool.
THE TEMPO
Creating a rugged cover is a marathon, not a sprint. You need to find your Maker's Rhythm. The first phase is The Mapping, which takes about forty five minutes. This involves calculating the "turn in" allowance based on the thickness of your sketchbook spine. Next is The Prep, a two hour window where we cut, skive, and temper the leather with oils. The Assembly is the longest stretch, often requiring four to six hours of focused hand stitching. Finally, The Curing takes twenty four hours. This is the period where the fibers settle into their new shape and the oils distribute evenly through the porous matrix. Do not rush the drying process; forced heat can cause the leather to shrink unevenly and warp your alignment.
THE CORE METHOD
1. The Architectural Cut
Measure your sketchbook and add a three percent margin to account for the outer radius bend. Use your rotary cutter to slice the main body. Ensure you are cutting with the grain direction for maximum stability. Cutting across the grain can lead to unwanted stretching over time.
Mastery Tip: Always check the flesh side of the leather for loose fibers. A tight, smooth flesh side indicates a higher density of collagen, which translates to better long term structural integrity.
2. Skiving the Edges
Use a French skiver to thin the edges where the leather will fold over. You are aiming to reduce the thickness by half. This reduces bulk and allows the cover to lay flat against the paper.
Mastery Tip: Skiving relies on shear force. Keep your blade at a shallow fifteen degree angle to avoid gouging. This creates a tapered edge that facilitates a seamless laminated bond.
3. The Reinforcement Layer
Apply a thin strip of Tyvek or heavy canvas to the spine area. This acts as a tension bridge. It prevents the leather from "bagging" or stretching out after repeated openings and closings.
Mastery Tip: This layer addresses mechanical fatigue. By introducing a non stretch material, you distribute the stress across a wider surface area, preventing localized fiber failure.
4. Pocket Integration
Cut your internal pockets and use a stitching groover to create a recessed path for your thread. This protects the stitches from abrasion. Align the pockets and secure them with a light coat of contact cement.
Mastery Tip: Use the principle of capillary action when applying glue. A thin, even coat allows the adhesive to penetrate the pores without oversaturating the material, which would lead to stiffness.
5. The Pilot Holes
Use a stitching pony to hold the cover steady and punch your holes with a four prong chiseling iron. Maintain a perfectly vertical strike to ensure the holes align on both the front and back faces.
Mastery Tip: Consistent hole spacing is vital for load distribution. Evenly spaced stitches ensure that no single point of the leather is bearing more tension than another during use.
6. The Saddle Stitch
Thread two needles on a single length of waxed cord. Pass them through the same hole from opposite sides. This creates an interlocking "figure eight" pattern that is significantly stronger than a machine lockstitch.
Mastery Tip: This technique utilizes friction locking. If one thread breaks, the other remains trapped by the surrounding leather fibers, preventing the entire seam from unraveling.
7. Burnishing the Perimeter
Dampen the edges with a bit of water or gum tragacanth. Use a wooden slicker to rub the edges vigorously until they become glossy and smooth. This seals the fibers against moisture.
Mastery Tip: Burnishing is a result of frictional heat and compression. You are essentially melting the natural waxes within the leather to create a waterproof, hardened barrier.
8. The Final Tempering
Apply a light coat of neatsfoot oil or beeswax conditioner. Massage it into the grain using circular motions. This restores the lipids lost during the crafting process and gives the cover its final "hand feel."
Mastery Tip: Leather is a polyamide structure. Conditioning keeps the protein chains lubricated, allowing them to slide past each other rather than snapping when the cover is flexed.
THE TECHNICAL LEDGER
Maintenance & Longevity: To keep your Custom Leather Sketchbook Covers in peak condition, wipe them with a dry microfiber cloth weekly. Every six months, apply a pH balanced leather conditioner. Avoid storing the cover in direct sunlight, as UV radiation breaks down the chemical bonds in the tannins, leading to "red rot" or brittleness.
Material Variations: For a sustainable twist, look for olive tanned leather, which uses waste water from olive oil production. For a premium feel, Shell Cordovan offers unparalleled density and a natural luster, though it requires specialized diamond tipped needles due to its extreme hardness.
The Correction:
- The Issue: The leather is too stiff to fold. The Fix: Lightly mist the grain side with distilled water to relax the fibers before using the bone folder.
- The Issue: Stitches are slanted or uneven. The Fix: Use a wing divider to scribe a guide line exactly 3mm from the edge before punching.
- The Issue: The glue is seeping through the stitch holes. The Fix: Wait for the cement to reach a "tacky" state (about 10 minutes) before joining the layers.
Studio Organization: Store your leather flat in a climate controlled environment with roughly 40 percent humidity. Use acid free tissue paper between finished covers to prevent oil migration between projects.
THE FINAL REVEAL
There it is. You have just transformed a flat hide into a three dimensional fortress. Feel the weight of it; notice how the saddle stitching creates a rhythmic, tactile border that frames your work. This cover is going to age beautifully. Every scratch and scuff it earns in the field will only add to its character, creating a map of your artistic journey. You didn't just make a sketchbook cover; you engineered a tool that respects the physics of your craft. It is rugged, it is elegant, and it is uniquely yours. Now, go fill those pages with something incredible.
STUDIO QUESTIONS
How do I choose the right leather weight?
Select leather based on thickness and rigidity. For sketchbook covers, a 5 to 6 ounce (2.0 to 2.4mm) weight offers the best balance of protection and flexibility without adding excessive bulk to your field kit.
Can I use a standard sewing machine?
Standard machines often lack the torque and needle clearance for heavy leather. Use a dedicated industrial walking foot machine or stick to hand stitching with a saddle stitch for superior durability and a professional finish.
Why is my leather edge "fuzzing" after cutting?
Fuzzing occurs when the blade is dull or the fiber density is low. Use a fresh carbide blade and finish the edge with a burnishing tool and gum tragacanth to compress and seal the loose protein fibers.
What is the best way to waterproof the cover?
Apply a beeswax based finish or a specialized leather wax. These substances create a hydrophobic barrier on the surface while still allowing the leather to breathe, preventing moisture from trapped within the internal fiber matrix.

