
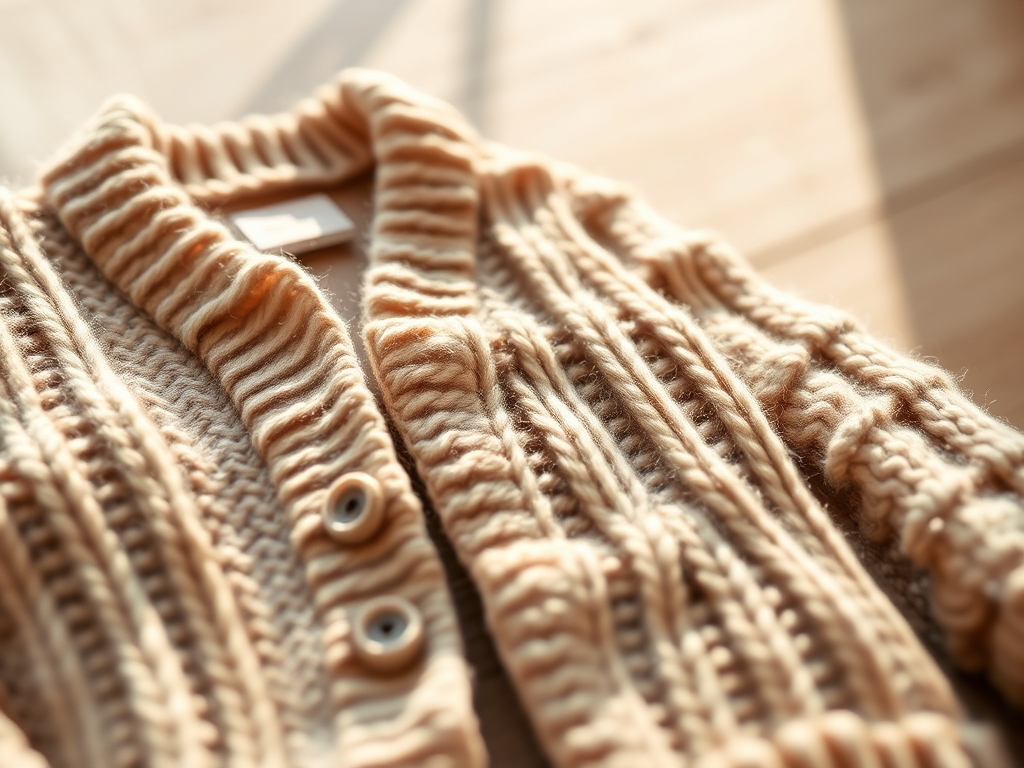
Imagine the scent of raw sheep wool meeting the sharp, clean aroma of freshly sanded cedar. Your fingertips brush against the intricate ridges of a seed stitch; it is a tactile symphony of tension and relief. When you are finishing Personalized Knitted Cardigans, you are not just closing a garment. You are securing a legacy. The weight of the yarn, perhaps a chunky merino with a high elastic recovery, demands a closure that respects its structural integrity. We are looking for buttons that do not just sit there; they need to anchor the knit without distorting the fabric gauge. It is about the physics of the toggle and the way a polished surface slides through a hand-worked buttonhole. You want that satisfying "click" of wood against wool, a sensory confirmation that the piece is complete. We are diving into the grit of material science to ensure these tiny anchors hold up against the chaotic energy of a toddler. This is where high-end haberdashery meets the playground, and we are going to make it indestructible.
THE STUDIO KIT
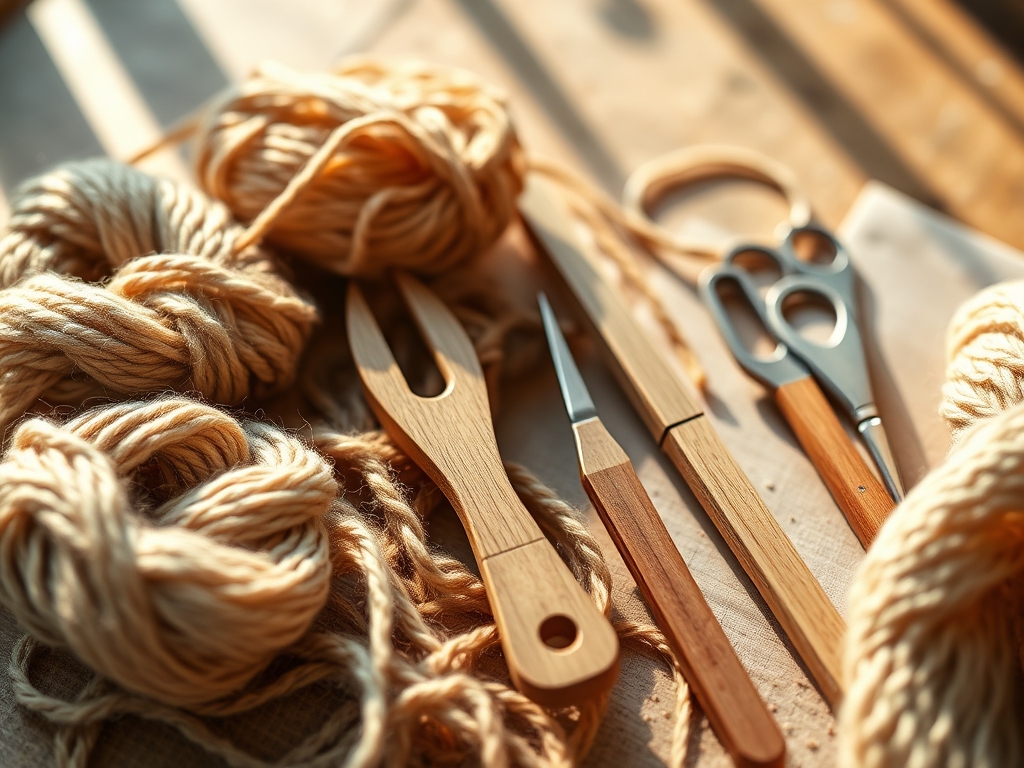
To execute this level of customization, your junk drawer won't cut it. You need precision instruments. Start with a set of digital calipers to measure the diameter of your buttonholes under tension; guessing leads to sagging plackets. You will need a tapestry needle with a blunt tip to navigate the interstitial spaces of the knit without splitting the fibers. For the buttons themselves, we are sourcing materials with high tensile strength and low porosity. Think olive wood, corozo nut, or heavy-duty resin. If you are working with wooden blanks, keep a bone folder and 400-grit sandpaper nearby to ensure every edge is smooth enough to prevent snagging the delicate ply of the yarn.
Material Substitutions: If organic wood is unavailable, look for casein buttons made from milk protein. They offer a similar thermal profile and "warm" hand-feel. For a vegan alternative that retains high structural density, tagua nut (vegetable ivory) provides incredible durability and a natural grain that mimics animal bone without the ethical footprint.
THE TEMPO
The "Maker's Rhythm" is a balance of mechanical precision and creative flow. For a standard toddler cardigan, expect to spend approximately 15 minutes on material calibration; this involves testing your button size against the knitted swatch to account for mechanical stretch. The actual attachment phase takes about 8 minutes per button if you are using a reinforced shank technique. Total project time for an 8-button layout is roughly 90 minutes. Do not rush the layout. The spacing must be mathematically perfect to prevent the "gaping" effect that occurs when a toddler moves. We work in a steady, rhythmic pulse: measure, pierce, loop, knot, and burnish.
THE CORE METHOD
1. Calibrating the Placket Tension
Before a single thread is pulled, you must understand the load-bearing capacity of your knit. Lay the cardigan flat on a blocking mat. Use your calipers to measure the buttonhole at rest and then under a 50-gram pull. This delta determines if you need a backing button for stability.
Mastery Tip: This involves Hooke's Law of elasticity. If the yarn has a high nylon content, it will snap back; if it is 100% cotton, it will deform. Always size your button 2mm larger than the resting hole to account for the inevitable fiber creep over time.
2. The Shank Elevation Technique
Never sew a button flush to the knit. You must create a "thread shank" to allow space for the overlapping fabric layers. Use a matchstick or a spacer tool placed between the button and the fabric during the sewing process. This creates a pillar of thread that prevents the fabric from puckering when fastened.
Mastery Tip: By elevating the button, you reduce the shear stress on the individual yarn strands. This prevents the button from "sawing" through the knit during high-activity play.
3. Anchoring the Root
Instead of knotting the thread on the surface, weave the tail through the structural pillars of the knit stitches for at least two inches. This distributes the pull force across a larger surface area rather than a single point of failure.
Mastery Tip: This utilizes frictional resistance. The more surface area the thread contacts within the yarn twist, the less likely it is to pull out under tension. It is the same principle used in high-tension cable anchoring.
4. The Backing Button Reinforcement
For chunky Personalized Knitted Cardigans, use a tiny, clear "stay button" on the inside of the garment. The thread passes through the decorative button, through the knit, and through the stay button before returning.
Mastery Tip: This creates a sandwich load distribution. It moves the pressure from the delicate yarn fibers onto the two rigid discs, effectively eliminating the risk of the button tearing a hole in the cardigan.
THE TECHNICAL LEDGER
Maintenance & Longevity: Natural wood and bone buttons require occasional conditioning. Apply a microscopic amount of beeswax or jojoba oil to the surface and buff with a lint-free cloth. This prevents the material from becoming brittle due to the low humidity often found in heated homes.
Material Variations:
- Sustainable: Recycled paper composite buttons offer surprising compressive strength.
- Premium: Mother of pearl provides a high refractive index for a luxury finish but requires hand-washing to avoid cracking in a machine drum.
The Correction:
- The Sag: If the button hangs down, your shank is too long. Snip and resew using a thinner spacer.
- The Gap: If the fabric pulls between buttons, the spacing is too wide for the yarn's modulus. Add a hidden snap between the buttons.
- The Snag: If the button catches on the yarn, use a jeweler's file to smooth the internal diameter of the button holes.
Studio Organization: Store your buttons in acid-free glass vials. Plastic bins can outgas over time, potentially yellowing light-colored natural fibers or degrading the finish on vintage buttons.
THE FINAL REVEAL
There is nothing quite like the moment those eight buttons are finally aligned. The cardigan transforms from a loose textile into a structured piece of wearable architecture. On Personalized Knitted Cardigans, these buttons act as the final punctuation marks on a story you have been knitting for weeks. The way the light catches the grain of the wood or the shimmer of the shell adds a layer of sophistication that store-bought items simply cannot replicate. It feels heavy, purposeful, and ready for a lifetime of adventures. You have balanced the physics of tension with the art of the craft; now it is time to let that toddler go out and put your engineering to the test.
STUDIO QUESTIONS
Which button material is most durable for toddlers?
High-density corozo nut or reinforced resin is best. These materials possess high impact resistance and low water absorption, meaning they won't crack during a rough wash cycle or shatter if dropped on a hardwood floor.
How do I prevent buttons from falling off?
Use the backing button technique and "lock" your thread by wrapping it around the shank five times before the final knot. This creates a mechanical bind that resists the vibrational loosening caused by constant movement.
What size button is standard for toddler knits?
Generally, a diameter of 15mm to 20mm is ideal. This size provides enough surface area for small hands to grasp (improving fine motor coordination) without being so heavy that it causes the front placket to sag.
Can I use vintage buttons on new wool?
Yes, but check for oxidization or sharp edges. Use a magnifying loupe to inspect the holes. If the edges are sharp, they will act like a knife against the wool's tensile fibers and eventually cut the yarn.
How do I align 8 buttons perfectly?
Use locking stitch markers to pin the plackets together before sewing. Measure the total length with a metal ruler and divide by seven to find the exact inter-button interval, ensuring a mathematically symmetrical distribution of tension.

