
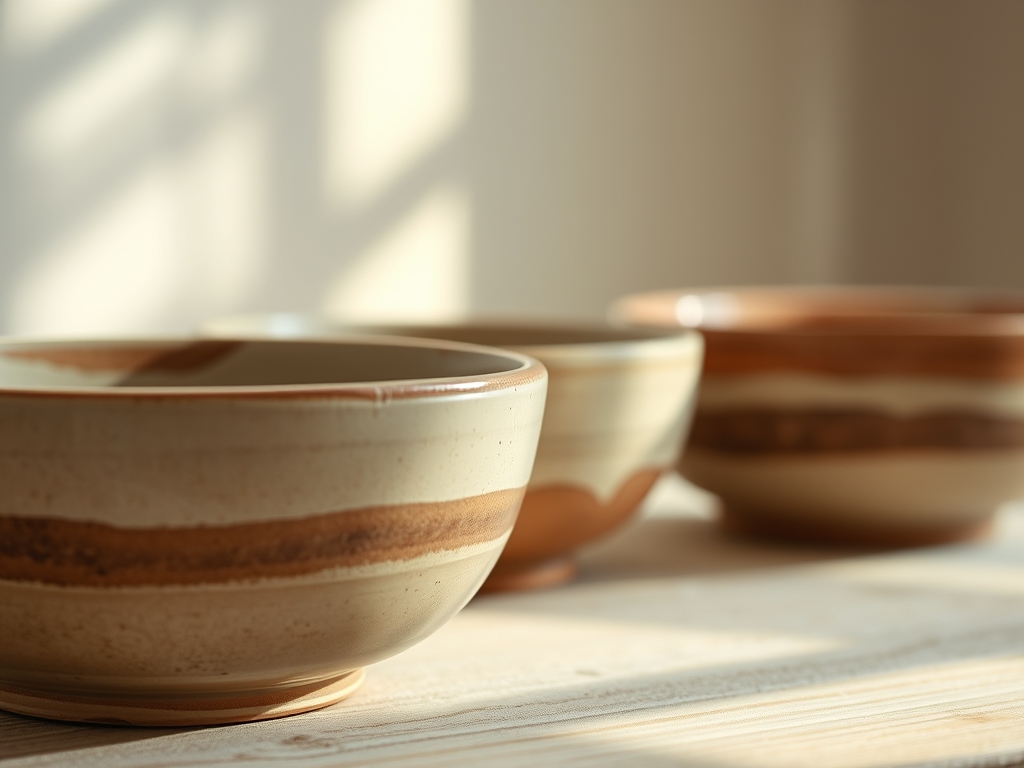
Wet clay has a specific, heavy scent that smells like rain on a dusty road. When you first plunge your hands into a fresh block of stoneware, you are feeling the literal weight of geological time. We are talking about particles of decomposed rock held together by water and surface tension. To create a series of five nesting Hand Thrown Mixing Bowls, you have to master the physics of centrifugal force while fighting the clay's natural urge to collapse under its own saturation. It is a dance of friction and fluid dynamics. You can feel the grit of the grog against your palms; those tiny bits of pre-fired clay act like a structural skeleton, giving the walls the tensile strength needed to stand tall as you pull them upward. If the clay is too soft, the bowl slumps like a tired toddler. If it is too dry, it resists your touch with a stubborn, abrasive friction. We are aiming for that perfect, buttery midpoint where the material becomes an extension of your own kinetic energy.
THE STUDIO KIT
To execute a professional nesting set, your toolkit must be as precise as a laboratory. You will need a high-torque electric wheel to maintain consistent RPMs under the weight of larger clay bodies. Calipers are your most vital instrument here; they ensure the diameter of each bowl is mathematically sequenced to fit within the next. You will also need a flexible steel rib for compressing the floor of the bowl and a wire clay cutter with a high-gauge stainless steel strand for a clean release from the bat. For the material, a mid-fire stoneware with a 5 percent grog content provides the ideal balance of plasticity and structural integrity.
Material Substitutions: If you cannot find stoneware, a high-fire porcelain is an option, though its lower "green strength" makes it prone to warping during the drying phase. For those without a professional kiln, air-dry clays are a poor substitute for mixing bowls because they lack the vitrification necessary to be food-safe and waterproof. Stick to true ceramic bodies if you want these to survive a kitchen environment.
THE TEMPO
The maker's rhythm is not just about speed; it is about managing the evaporation rate of your medium. The entire process for a five-piece nesting set takes approximately ten to fourteen days from the first throw to the final glaze fire. The initial "throwing" phase is high-intensity and takes about three hours of focused wheel time. Following this is the "leather-hard" stage, which usually occurs 24 to 48 hours later depending on the humidity of your studio. This is the window for trimming the foot rings.
The "bone-dry" phase is the longest wait, lasting five to seven days. During this time, the chemically bound water leaves the clay, and the piece reaches its maximum fragility. Attempting to fire too early results in a "steam explosion" as trapped moisture expands rapidly. The final tempo involves two separate kiln firings: the bisque fire to harden the body for glazing, and the glaze fire to reach vitrification, where the clay becomes non-porous and glass-like.
THE CORE METHOD
1. Sequential Weight Calibration
Before you touch the wheel, you must weigh out five distinct balls of clay. For a standard nesting set, I recommend a mathematical progression: 1 lb, 2 lbs, 3.5 lbs, 5 lbs, and 7 lbs. This distribution accounts for the volume-to-surface-area ratio required for each bowl to nest comfortably without touching the rim of the one below it. Centering the larger masses requires significant core strength and a steady "anchor" of your elbows against your hip bones.
Mastery Tip: The science of centripetal force dictates that the faster the wheel spins, the more the clay wants to move outward. By keeping your hands locked in a fixed position, you force the clay into the center, aligning the particles into a concentric circle.
2. Opening the Floor and Compressing
Once centered, you must press your thumbs into the middle to create the interior floor. For mixing bowls, a flat, wide floor is superior to a V-shape because it provides stability for a whisk or spatula. After opening, use a wooden tool to compress the floor from the center to the wall. This prevents "S-cracks," which are structural failures caused by uneven tension during the drying process.
Mastery Tip: Compression forces the flat, plate-like clay particles to lay down in an overlapping pattern, much like scales on a fish, which significantly increases the floor's resistance to thermal shock.
3. Pulling the Walls and Caliper Checks
As you pull the walls upward, you must maintain a consistent thickness of about 1/4 inch. This is where your calipers come into play. Measure the interior diameter of the largest bowl first, then subtract one inch for the next bowl in the sequence. This ensures a half-inch "finger gap" between each nested piece, allowing the baker to lift them out easily without chipping the rims.
Mastery Tip: The hydrostatic pressure of the water on your hands reduces friction, but too much water will dissolve the clay's bond. Use a sponge to pull excess water from the bottom to prevent the base from becoming "mushy" and losing its load-bearing capacity.
4. Refining the Rim and Trimming
The rim is the most vulnerable part of the bowl. It must be slightly thicker than the walls to prevent warping in the kiln. Once the bowls reach a leather-hard state, flip them over on the wheel and use a loop tool to carve a foot ring. This reduces the weight and gives the bowl a professional, elevated profile.
Mastery Tip: A burnishing technique on the rim—rubbing it with a smooth stone or metal rib—aligns the surface particles to create a denser, chip-resistant edge.
THE TECHNICAL LEDGER
Maintenance & Longevity: To ensure your Hand Thrown Mixing Bowls last for decades, avoid "thermal shock" by never moving a bowl directly from a cold refrigerator into a hot oven. Hand-washing is preferred to preserve the glaze's luster, as dishwasher detergents contain abrasives that can etch the surface over time.
Material Variations:
- Sustainable: Reclaim your "slop" (scrap clay) by drying it on plaster bats to create a recycled clay body with unique variegated colors.
- Premium: Use a "speckled buff" clay which contains manganese clusters that bloom through the glaze for a high-end, artisanal look.
The Correction:
- The Slump: If the wall collapses, you likely pulled it too thin at the base. Fix: Use a heat gun to stiffen the base before continuing the pull.
- The Wobble: If the bowl is off-center, your "opening" was asymmetrical. Fix: Use a needle tool to cut a thin ring off the top to level the rim.
- The Crack: If a crack appears in the bottom during drying, it is due to poor compression. Fix: These cannot be truly fixed once bone-dry; recycle the clay and start over with better floor compression.
Studio Organization: Store your wet bowls under thin plastic sheeting. This slows the evaporation rate, ensuring the rim and the base dry at the same speed, which prevents the rim from pulling away and cracking.
THE FINAL REVEAL
There is nothing quite like the moment you unstack a finished set of Hand Thrown Mixing Bowls. The way they ring like a bell when tapped is the sound of perfect vitrification. They feel substantial in your hands; balanced, ergonomic, and radiating the warmth of the kiln. For a baker, these are not just vessels; they are precision tools that hold the ingredients for a lifetime of memories. The smooth, glazed interior makes folding flour into egg whites a tactile dream.
STUDIO QUESTIONS
Why do my bowls warp into ovals during firing?
Warping usually occurs during the drying phase if the rim dries faster than the base. Use plastic to ensure even evaporation. It can also happen if the clay was not properly centered, creating uneven wall thickness and tension.
How do I ensure the bowls nest perfectly?
Use calipers to measure the interior diameter of the larger bowl and the exterior diameter of the smaller one. Always leave at least a half-inch of clearance to account for the clay's 10 to 12 percent shrinkage rate.
Is stoneware better than porcelain for mixing bowls?
Stoneware is generally superior for heavy kitchen use. It has higher "chip resistance" and is more forgiving during the throwing process. Porcelain is beautiful but much more prone to warping and cracking under the stress of nesting.
Can I use these bowls in the microwave?
Yes, provided you use a food-safe glaze and the clay has reached full vitrification. Avoid glazes with high metal content, like certain manganese or copper finishes, as these can cause arcing and damage the ceramic structure.

