

Close your eyes and imagine the cold, gritty sensation of wet stoneware slipping through your fingers as the wheel spins at eighty revolutions per minute. There is a specific, primal magic in the way a lump of earth transforms into functional art. When we talk about Hand Thrown Sake Sets, we are not just discussing pottery; we are discussing the manipulation of mineral particles and water tension to create a vessel that honors a centuries old tradition. Sushi nights demand a certain aesthetic gravity that only handmade ceramics can provide. The weight of a bottle, the delicate rim of a cup, and the way the glaze breaks over a hand carved edge all contribute to the sensory experience of the meal. You want pieces that feel intentional. You want designs that balance the rugged nature of the clay with the refined precision of Japanese minimalism. This is where high fire chemistry meets the soul of the maker. We are going to dive deep into the physics of the wheel to ensure your next dinner party is anchored by professional grade craftsmanship.
THE STUDIO KIT
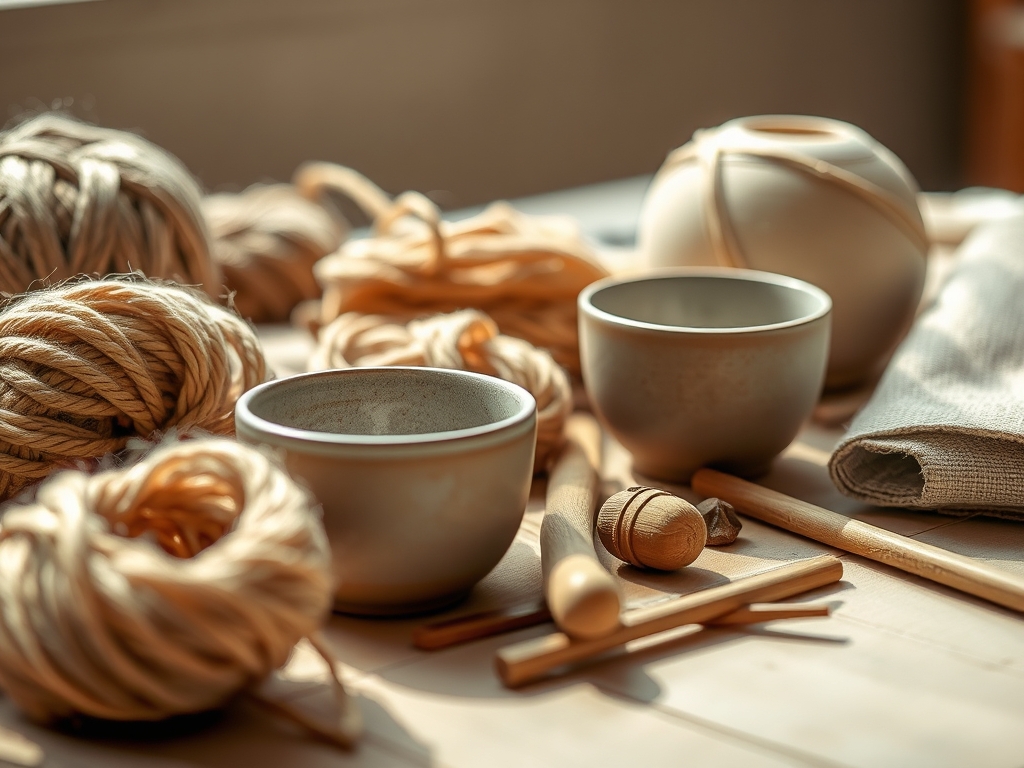
To master Hand Thrown Sake Sets, your tool kit must be as precise as a surgeon's tray. You will need a high torque electric wheel capable of maintaining steady speeds under the pressure of centering. Your primary material is a mid range stoneware clay with a fine grog content; this provides the necessary tensile strength to prevent sagging during the throwing process while maintaining a smooth surface for the lips. You will also require stainless steel calipers for measuring the diameter of the bottle neck against the cups, ensuring a cohesive visual language. A teardrop shaped tungsten carbide trimming tool is essential for refining the foot rings, while a flexible polymer rib will help you compress the clay particles to eliminate porosity.
For material substitutions, if you cannot find specific stoneware, a porcelain blend offers incredible translucency but requires a higher level of "thrower's touch" due to its low structural memory. If you lack a professional kiln, look for low fire earthenware, though you must use a lead free, food safe glaze to ensure the vessels remain non porous. Always keep a natural sea sponge and a wire cut off tool with a high gauge stainless steel strand to ensure a clean release from the bat.
THE TEMPO
The "Maker's Rhythm" is a dance between moisture evaporation and structural stability. Total production time for a full set usually spans ten to fourteen days. The initial throwing phase is fast and high energy, taking about twenty minutes per piece. However, the leather hard stage is the most critical window. This occurs roughly twenty four hours after throwing, when the clay has lost about fifteen percent of its moisture. This is when you trim. Following the trim, a slow seven day drying period is mandatory to prevent differential shrinkage, which leads to S-cracks in the base. The firing cycle includes a bisque fire to 1850 degrees Fahrenheit, followed by a glaze fire that reaches "Cone 6" or approximately 2232 degrees Fahrenheit, where the silica and flux melt into a vitrified, glass like coating.
THE CORE METHOD
1. Centering and Opening the Mass
Start by securing a one pound ball of clay to the wheel head. Use your palms to apply lateral pressure while your non dominant hand pushes down, forcing the clay into a perfect, wobbless cylinder. This is the foundation of all Hand Thrown Sake Sets. Once centered, use your thumb to create a centered well, stopping exactly half an inch from the bat to leave enough material for a sturdy foot.
Mastery Tip: This stage relies on centripetal force. By keeping your elbows locked against your hips, you use your skeletal structure rather than muscle to overcome the resistance of the clay, ensuring the particles are aligned in a tight, concentric spiral.
2. Pulling the Walls for Verticality
With a slow wheel speed, pinch the clay at the base and lift steadily. For a sake carafe (tokkuri), you need a tall, narrow profile. Focus on maintaining an even wall thickness of approximately three millimeters. Use your calipers to check the interior diameter frequently. As the cylinder rises, the clay undergoes hydrostatic pressure, where the water in the clay acts as a lubricant between the platelets.
Mastery Tip: Always pull slightly inward as you go up. Physics dictates that centrifugal force will naturally pull the clay outward; by overcompensating with an inward lean, you prevent the bottle from collapsing into a bowl shape.
3. Collaring the Neck
To create the iconic sake bottle shape, you must "collar" the top third of the cylinder. Wrap both hands around the clay and gently squeeze as the wheel turns. This compresses the circumference, thickening the walls as the diameter decreases. You must be careful not to trap air or create folds in the clay, which would compromise the structural integrity during the fire.
Mastery Tip: Use a wooden rib to burnish the exterior while collaring. This flattens the clay "scales" and forces out excess water, increasing the surface tension and allowing the neck to stand taller without wilting.
4. Throwing the Ochoko Cups
Sake cups are small, requiring high precision. Use the "off the hump" technique, where you place a large mound of clay on the wheel and throw multiple small cups from the top portion. This saves time and ensures a consistent gauge across the entire set. Each cup should hold approximately two ounces of liquid.
Mastery Tip: Pay attention to the rim geometry. A slightly flared rim uses capillary action to pull the liquid toward the palate, enhancing the flavor profile of the sake. Use a chamois cloth to compress the rim for a professional, rounded finish.
5. Trimming the Foot Rings
Once the pieces are leather hard, flip them over on the wheel. Use your tungsten carbide tool to carve away excess clay from the base. A recessed foot ring creates a "shadow line" that makes the vessel appear to float on the table. This is the hallmark of high end, minimal design.
Mastery Tip: Trimming is about mass distribution. By removing weight from the bottom, you lower the center of gravity, making the carafe less likely to tip over during a busy dinner service.
6. Glazing for Vitrification
Apply a matte or satin glaze using a dipping method. For a minimal look, a "Nuka" style glaze or a simple matte white provides a clean canvas. Ensure the bottom of the foot ring is wiped completely clean of glaze using a damp sponge to prevent the piece from fusing to the kiln shelf.
Mastery Tip: The glaze must reach its eutectic point, the specific temperature where all components melt together. This creates a chemical bond with the clay body, rendering the set completely waterproof and hygienic.
THE TECHNICAL LEDGER
Maintenance & Longevity: Hand thrown ceramics are durable but sensitive to thermal shock. Avoid moving a set directly from a cold refrigerator to a boiling water bath. Hand wash with mild detergent to preserve the glaze luster over time.
Material Variations:
- Sustainable: Reclaim your "slop" (excess wet clay) to create a variegated "agateware" look.
- Premium: Add five percent calcined alumina to your glaze for a buttery, scratch resistant finish.
The Correction:
- The S-Crack: Caused by uneven drying. Fix: Compress the floor of the pot more aggressively with a wooden rib during step one.
- The Slump: The neck collapses during collaring. Fix: Use a heat gun to slightly stiffen the base of the neck before finishing the top.
- Glaze Crawling: Glaze pulls away from the clay. Fix: Ensure the bisque ware is free of dust and oils before dipping.
Studio Organization: Store your damp pieces in a wet box (a plastic bin with a layer of set plaster at the bottom). This maintains a one hundred percent humidity environment, allowing you to pause your work for days without the clay drying out.
THE FINAL REVEAL
There is nothing quite like the moment you pull your finished Hand Thrown Sake Sets out of the kiln. The transformation from dull, fragile mud to a ringing, vitrified masterpiece is intoxicating. Your minimal designs, with their clean lines and ergonomic foot rings, are ready to take center stage. They feel heavy enough to signify quality but light enough to handle with grace. When you pour that first stream of chilled Junmai into a perfectly weighted cup, you will feel the connection between your hands and the ancient craft.
STUDIO QUESTIONS
Can I use any clay for sake sets?
No, you must use vitrified stoneware or porcelain. These clays become non porous when fired to high temperatures, ensuring the sake does not seep into the walls or harbor bacteria between uses.
Why did my bottle neck wobble during throwing?
Wobbling usually indicates the clay was not perfectly centered or your hand pressure was uneven. Ensure your elbows are braced and your movements are slow and deliberate to maintain the vertical axis.
How do I make all six cups the same size?
Use stainless steel calipers to measure the height and width of the first cup. Keep these measurements as a constant reference while throwing the remaining five pieces "off the hump."
Is a matte glaze safe for food and drink?
Most modern matte glazes are food safe, but check the SDS (Safety Data Sheet). Avoid glazes with high concentrations of heavy metals like manganese or barium, which can leach into acidic liquids.

